
In January of this year, 269 billion emails were sent daily. And with the growing popularity of mobile email, usage will further increase before the year ends. Email is not dead, and it will be just as alive with the iOS Mail.
Imagine what you can do with this app if you know how to exploit its many features. To be the master of email on iOS means you can send, compose and manage your emails in the simplest ways possible. Who doesn’t want that? If you rely on the iOS Mail for work, you can increase your productivity.
Amazing Tricks to Do with iOS Mail App
Move your messages between multiple email accounts
You may have several Gmail accounts, but you can only access emails specific to an account. iOS Mail has a feature that breaks the barriers between accounts, allowing you to move a message without forwarding it.
- Open a specific message
- Click the File icon–which resembles a file folder, at the bottom of the page

- On the next screen, click Accounts at the top to pull up a list of integrated email accounts.
- Click a specific email account, choose a folder/label, and then file it.
Attach a file quickly and easily
Gone are the days when attaching a file in the Mail app feels like rocket science. With the new updates, it’s as easy as 1-2-3.
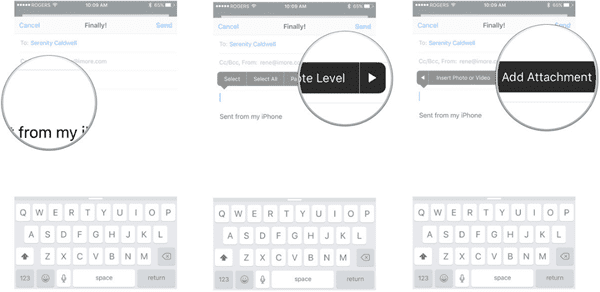
- Long-press a message and wait for the pop-up menu
- Choose to attach a file, paste, or insert video/photos in your camera roll.
- Click Locations at the top if you are not accessing files from the default source, which is the iCloud.
- Use Mail Drop if the file attachment is bigger than what is allowed by the email service. The feature automatically opens if you send a file over 20MB.
Note: When using Mail Drop, your email recipient will receive a link that they must access within the 30-day period upon receipt. Otherwise, the attachment becomes inaccessible.
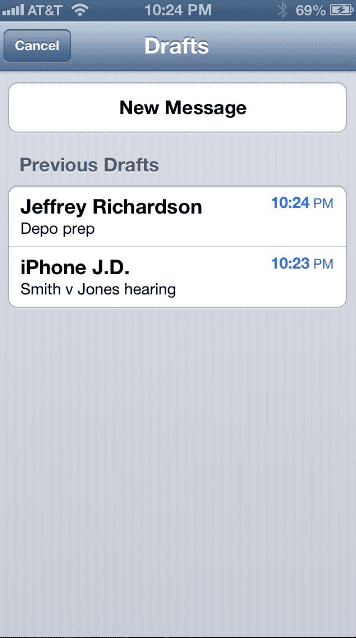
Save & recover mail drafts quickly
Composing an email on your mobile phone is usually automatically saved as a draft when you quit an email service, but getting back to it may involve several other steps. With the iOS Mail app, however, you simply swipe down from the top to save the email as a draft. Then look for its email subject at the bottom of the screen to open and finish it.
If there are multiple drafts, they are shown in a stack. To delete a draft, simply click X or swipe left.
Want to recover that draft you just deleted? Simply hold down on the compose button to pull up a list of drafts that you can edit and finish. This only works if the draft is recoverable, however. So think twice before deleting a draft.
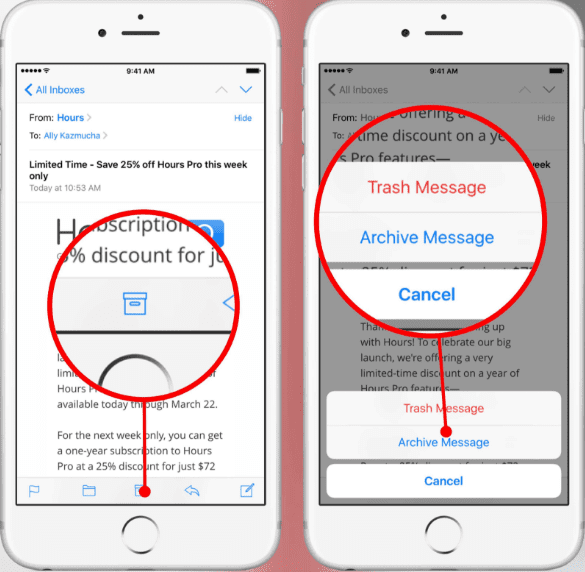
Archive or delete a message in a tap or two
When reading a message in Mail.app, you will find an icon at the bottom of the screen that resembles a file box with a lid on top. Tapping on it will pull up a menu that lets you Trash Message or Archive Message. In two taps, you can file away or delete the current message you’re reading.
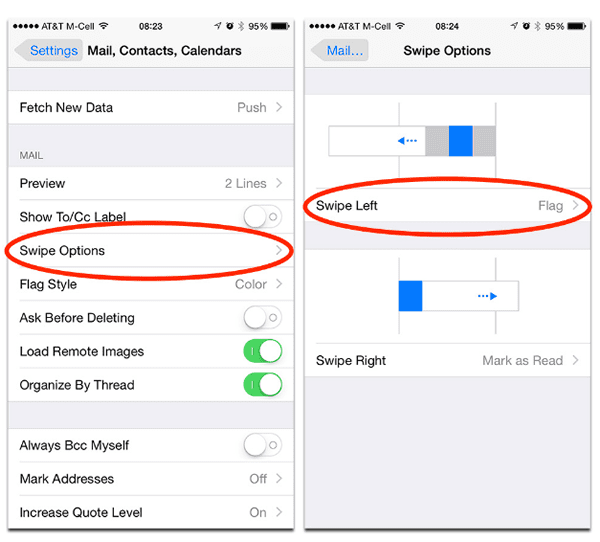
Manage emails with a swipe of your finger
You can set up Apple Mail in such a way that you have an option to mark read/unread, move, archive or delete an email without opening it. Yes, you can perform any of these actions right in your Inbox with just a swipe of your finger to the left or right. What happens when you swipe in either direction will depend on how you set up Swipe Settings. Just go to Settings > Mail, Contacts, Calendars > Swipe Settings, and then start changing the configurations.
Use Touch ID for secure access to emails

With a Touch ID support for Outlook for iPhone and iPad, you can add another layer of security to your emails. This is the best way to keep prying eyes from peeking into confidential emails, or ensuring that those sensitive messages don’t fall into the wrong hands. If you’re using Outlook or CloudMagic on your iOS device, this security feature is definitely a must-have.
Set up VIP Alerts
Want to turn off notifications but still want to know when special people in your contact list send you an email through the Mail app? Just set up the VIP Alerts, so you’re notified if they sent you any message while keeping everyone else on mute.

- Click Edit at the top of the Mail app to turn on VIP
- On your list of Mailboxes, click the I in a circle to add people to your VIP list. Make sure your VIPs are in your iOS Contacts.
- Click VIP Alerts to assign special notification alerts for people in your VIP list.
Master these tricks and you are sure to get more from your iOS Mail.

