Changing the default DNS settings on your computer can improve your online privacy, security, and browsing speed. If you’re a parent, changing your DNS server can also block your children from seeing any inappropriate content. Plus, changing your DNS will allow you to access content that is blocked in your country. Here’s how to change your DNS server on a Windows 10 or Mac computer, and which DNS addresses you should use.
What Is DNS?
DNS (Domain Name System) is like the phone book of the internet. If you want to visit a website, you will usually type in a domain name like google.com. A DNS will convert that into an IP address, which your web browser can understand.
An IP address is a string of characters separated by periods and comas. For example, one IP address for Google.com is http://173.194.203.106/. However, a DNS address is only one part of the equation these days. So, you won’t always be able to access a website using its IP address anymore.
Your internet service provider (such as Comcast, Verizon, and Spectrum) will assign you a default DNS. However, you can always change your DNS setting on a Mac or Windows 10 PC.
How to Change Your DNS Server on a Windows 10 Computer
To change your DNS server on a Windows 10 computer, go to Settings > Network & Internet > Change Adapter Settings. Then right-click a connection and select Properties > IPv4 > Properties. Finally,select Use the following DNS server address.
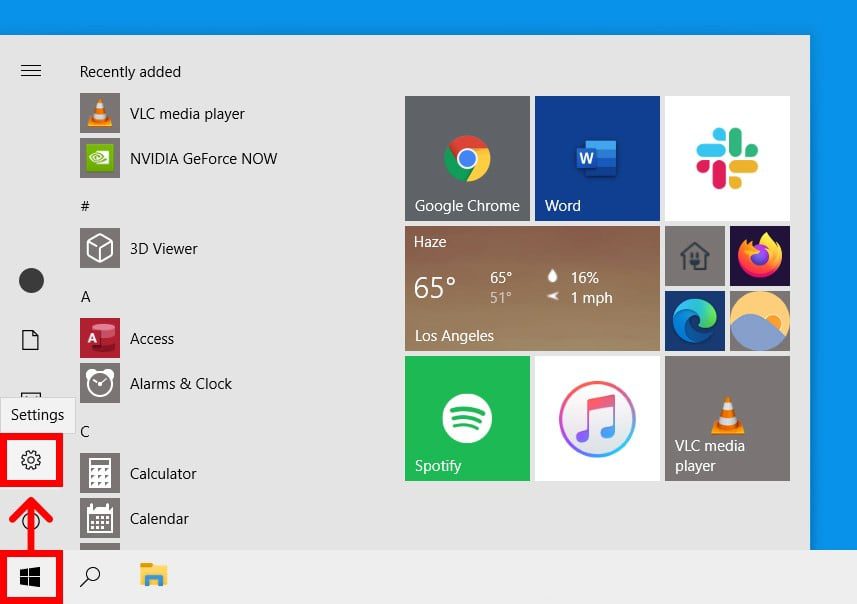
- Open the Windows Start Menu. You can do this by clicking the button with the Windows logo in the bottom-left corner of your screen.
- Then click Settings. This is the gear-shaped icon just above the power button.
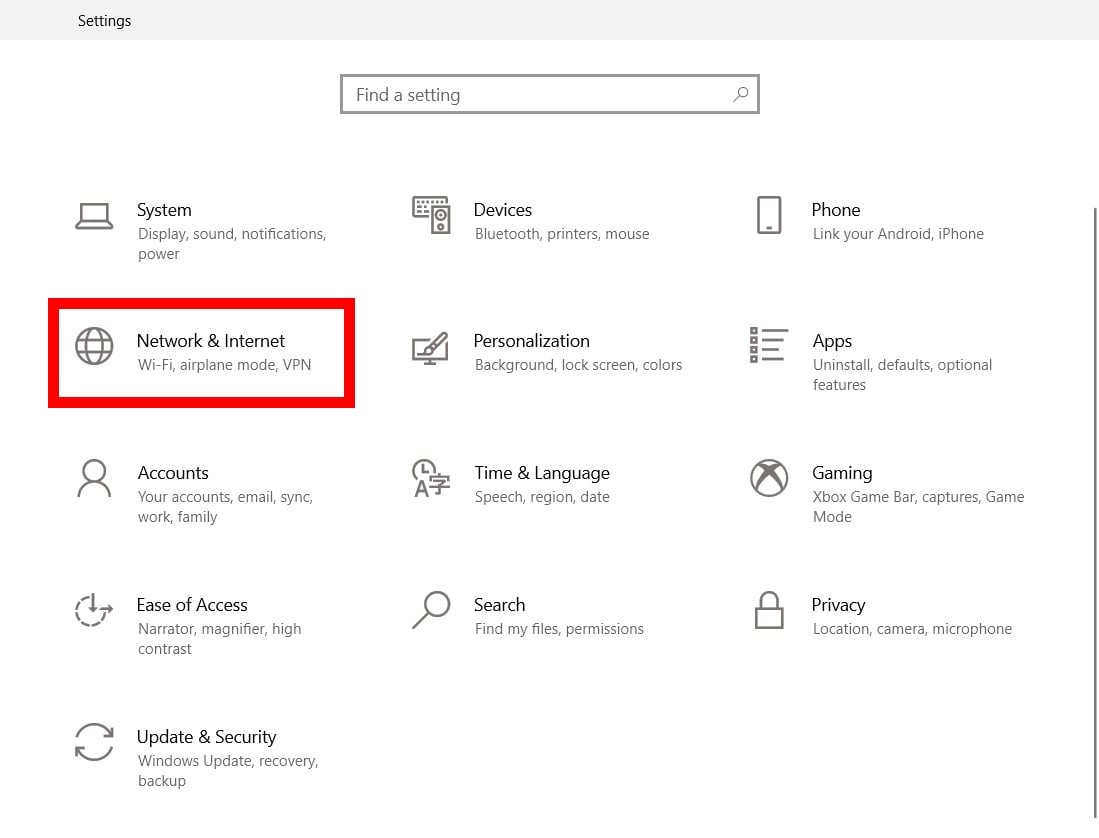
- Next, select Network & Internet.
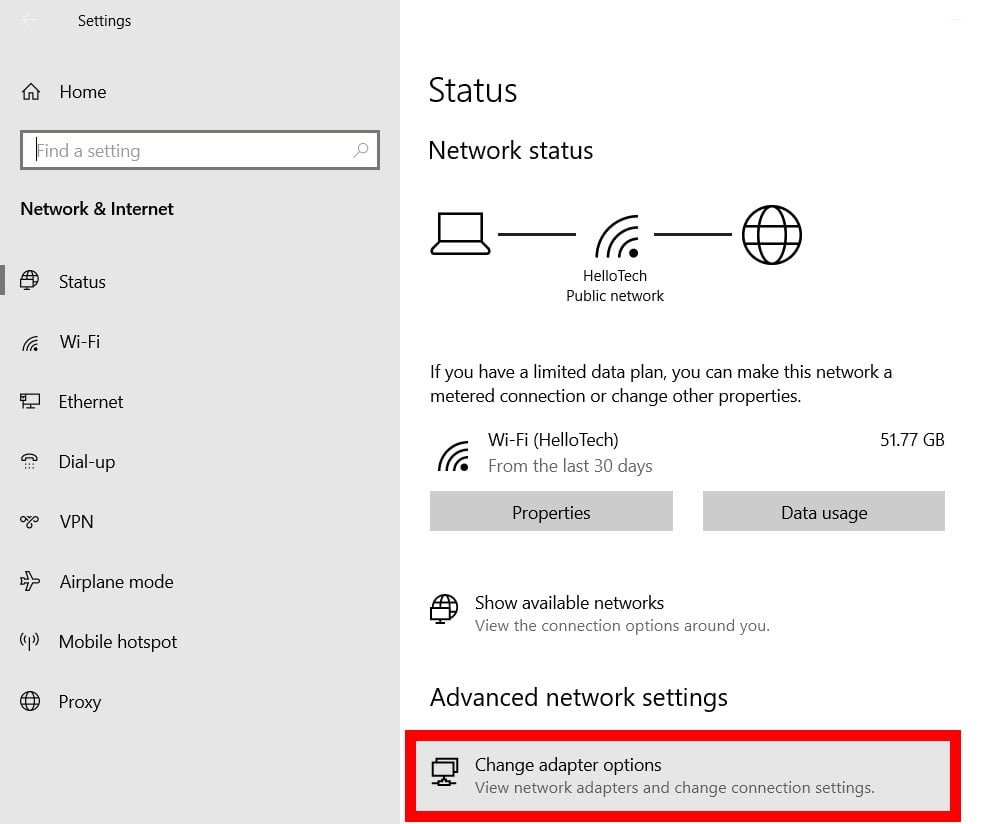
- Then click Change adapter options. You will see this under Advanced network settings.
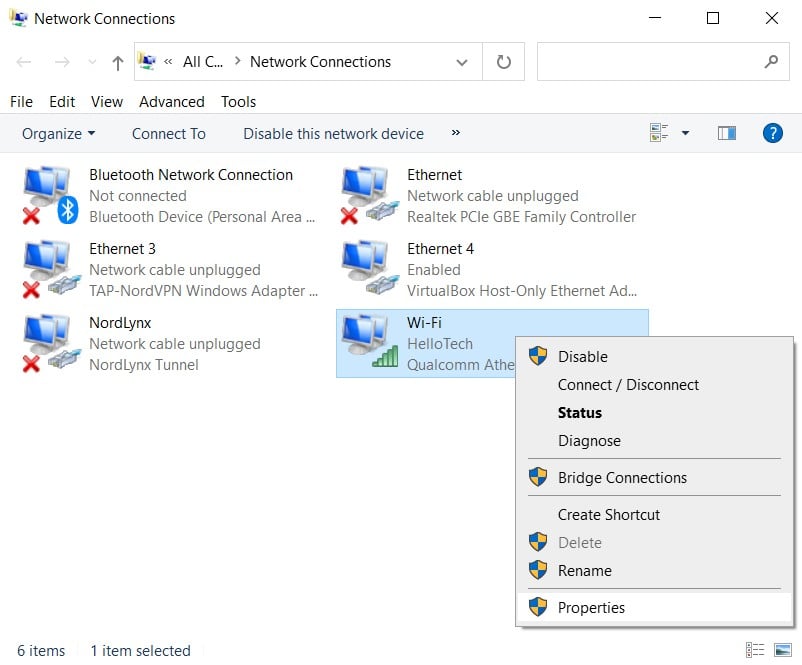
- Right-click on the connection you want to change the DNS server for. If you are connected via WiFi, select that. If you are connected via Ethernet, select that. You will know which connections you are currently using because they will have green bars, while the connections that are not in use will have a red X.
- Then select Properties. This will be the last option in the pop-up menu.
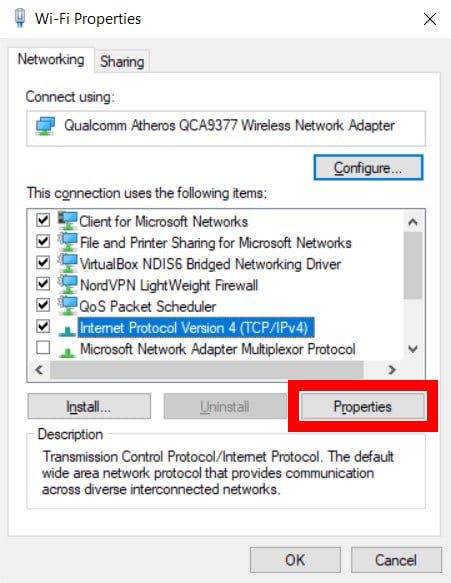
- Next, select Internet Protocol Version 4 (TCP/IPv4). If you don’t see this option, use your mouse to scroll up and down the selection.
- Then click Properties.
- Next, click the radius next to Use the following DNS server addresses. You will see this in the bottom half of the window.
- Then enter a new DNS address. You will also want to add a secondary DNS server address in the following line.
- Finally, click OK. You will see this at the bottom of the window. Your changes won’t go into effect until you click OK.

How to Change Your DNS Server on a Mac
To change your DNS server on a Mac, go to System Preferences > Network. Then select a connection and click Advanced. Next, select the DNS tab and click the plus sign. Finally, enter a DNS address and click OK > Apply.
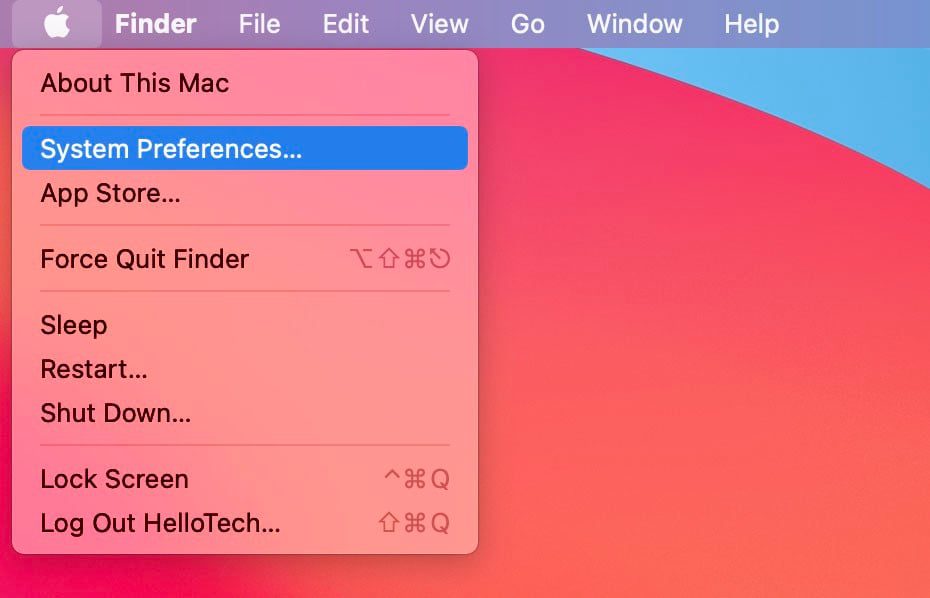
- Click the Apple icon in the top-left corner of your Mac’s screen.
- Then select System Preferences.
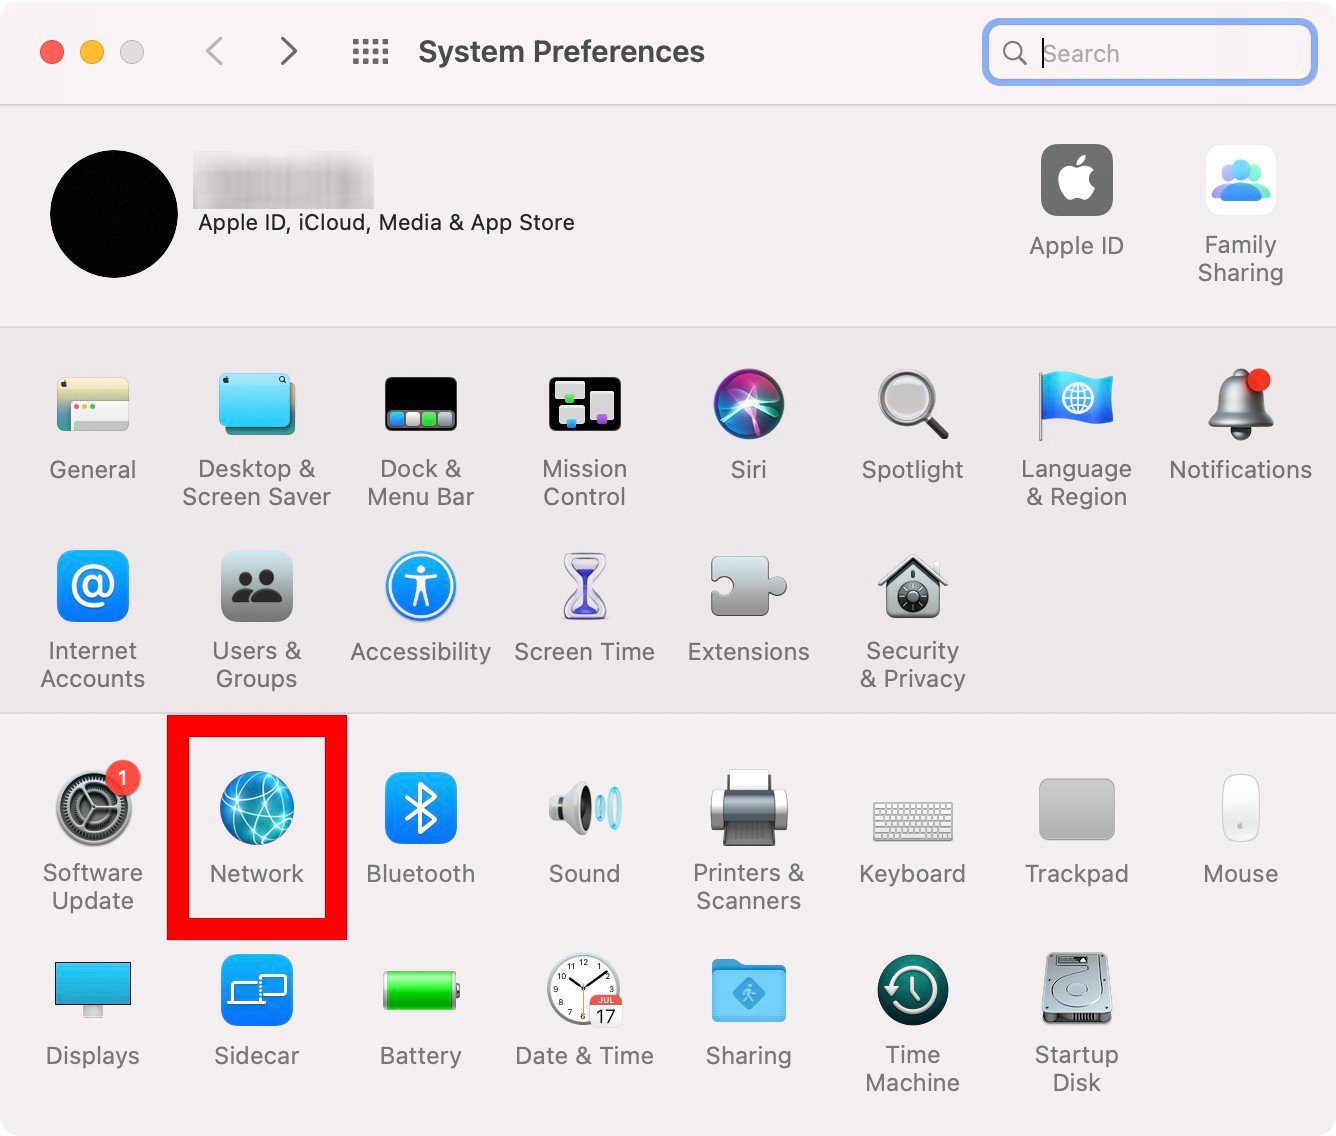
- Next, select Network.
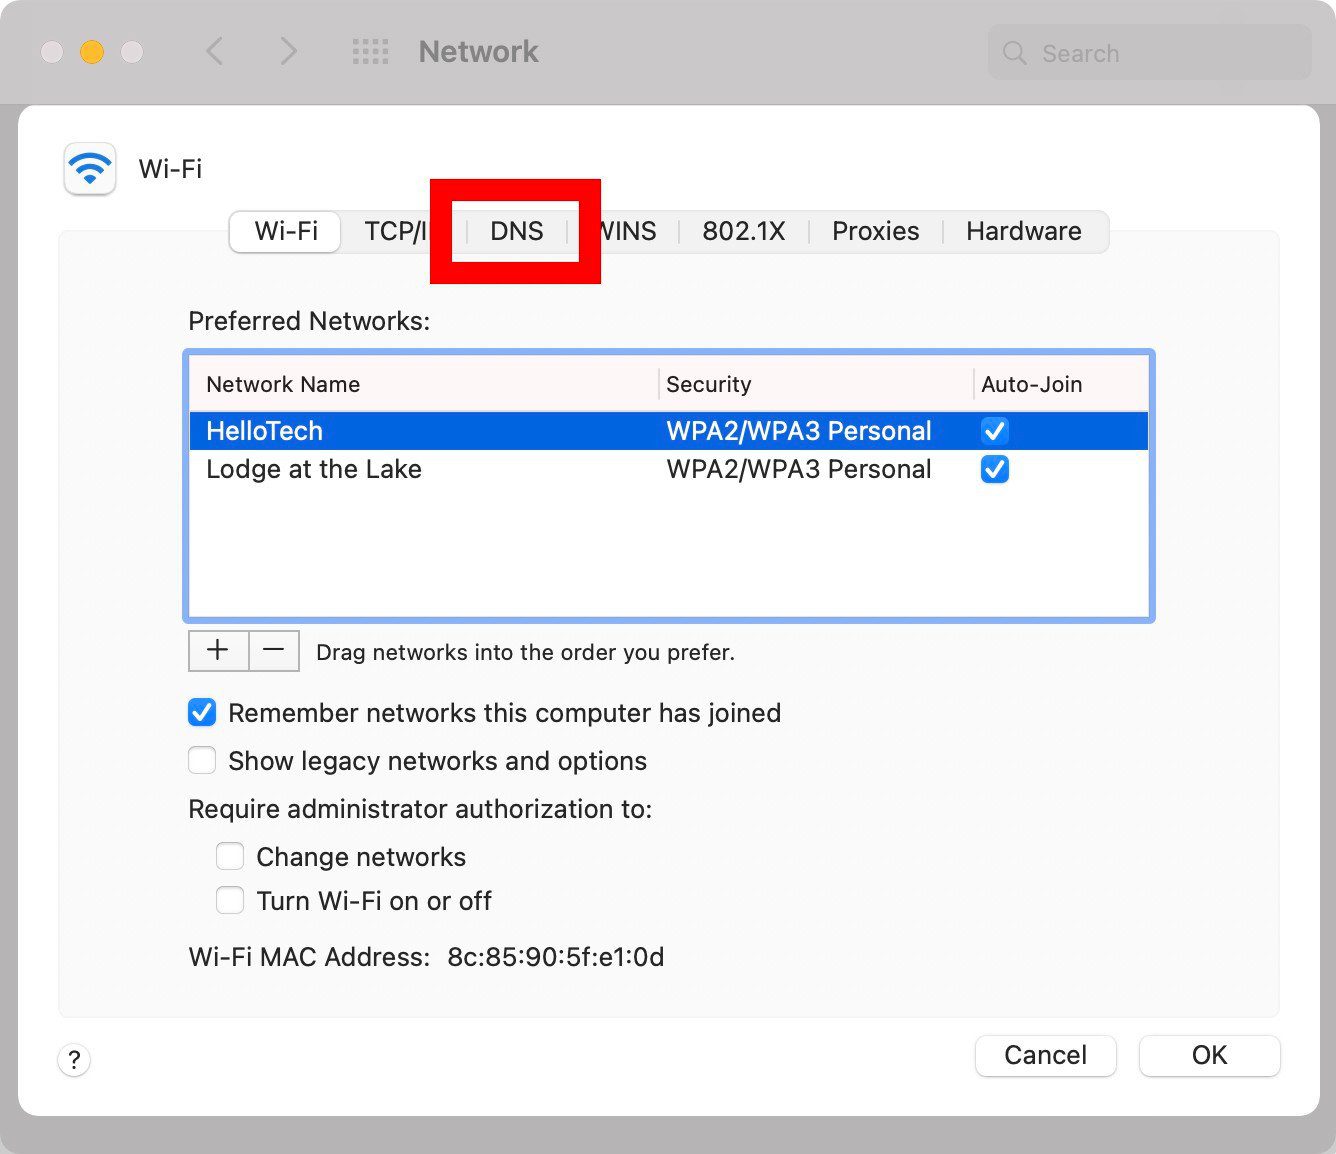
- Then select the connection that you want to change DNS server for. You will see all your different network connections in the left sidebar. You will know which connections you are currently using because they will have a green circle, while the connections you are not using will have a red circle.
- Then click on Advanced. You will see this in the bottom-right corner of the window.

- Next, click on the DNS tab. You will see this at the top of the window.
- Then click on the plus icon (+). You will see this at the bottom of the DNS Servers pane.
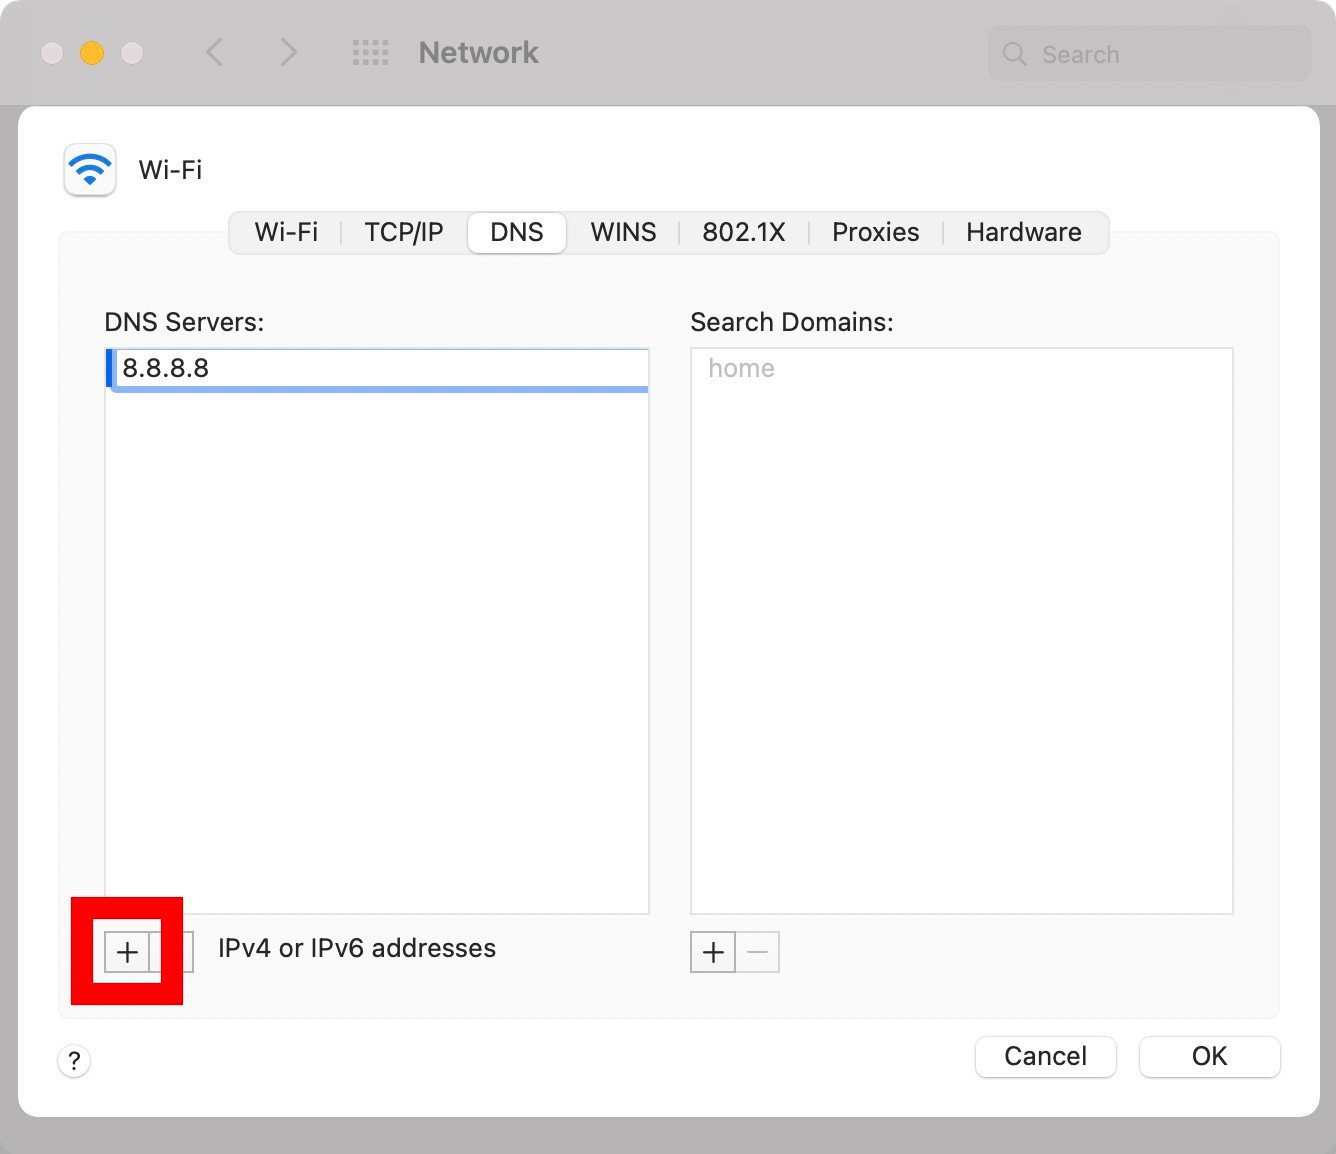
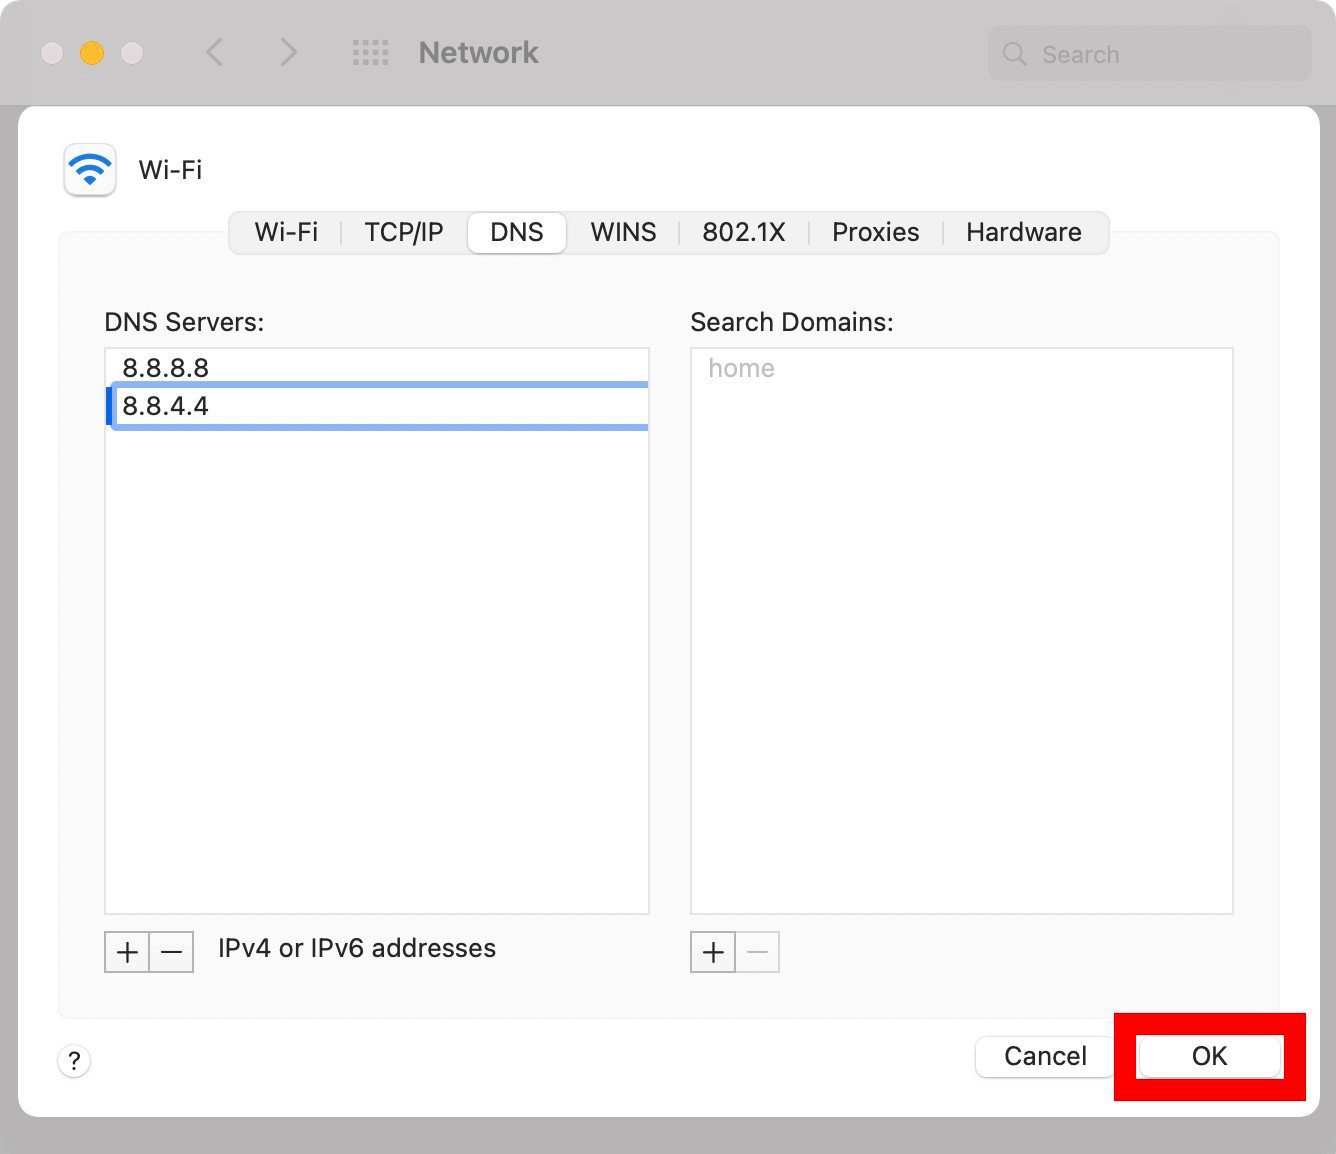
- Then enter new DNS addresses. You will want to enter a primary and secondary DNS address. When a URL needs to be resolved, your Mac will query the first entry on your DNS server list. If no response is received, it will move on to the next entry. This will go on and on until a response is received or when all servers have been queried.
- Next, click OK. The Advanced window will close, and you will be brought back to the Network window.
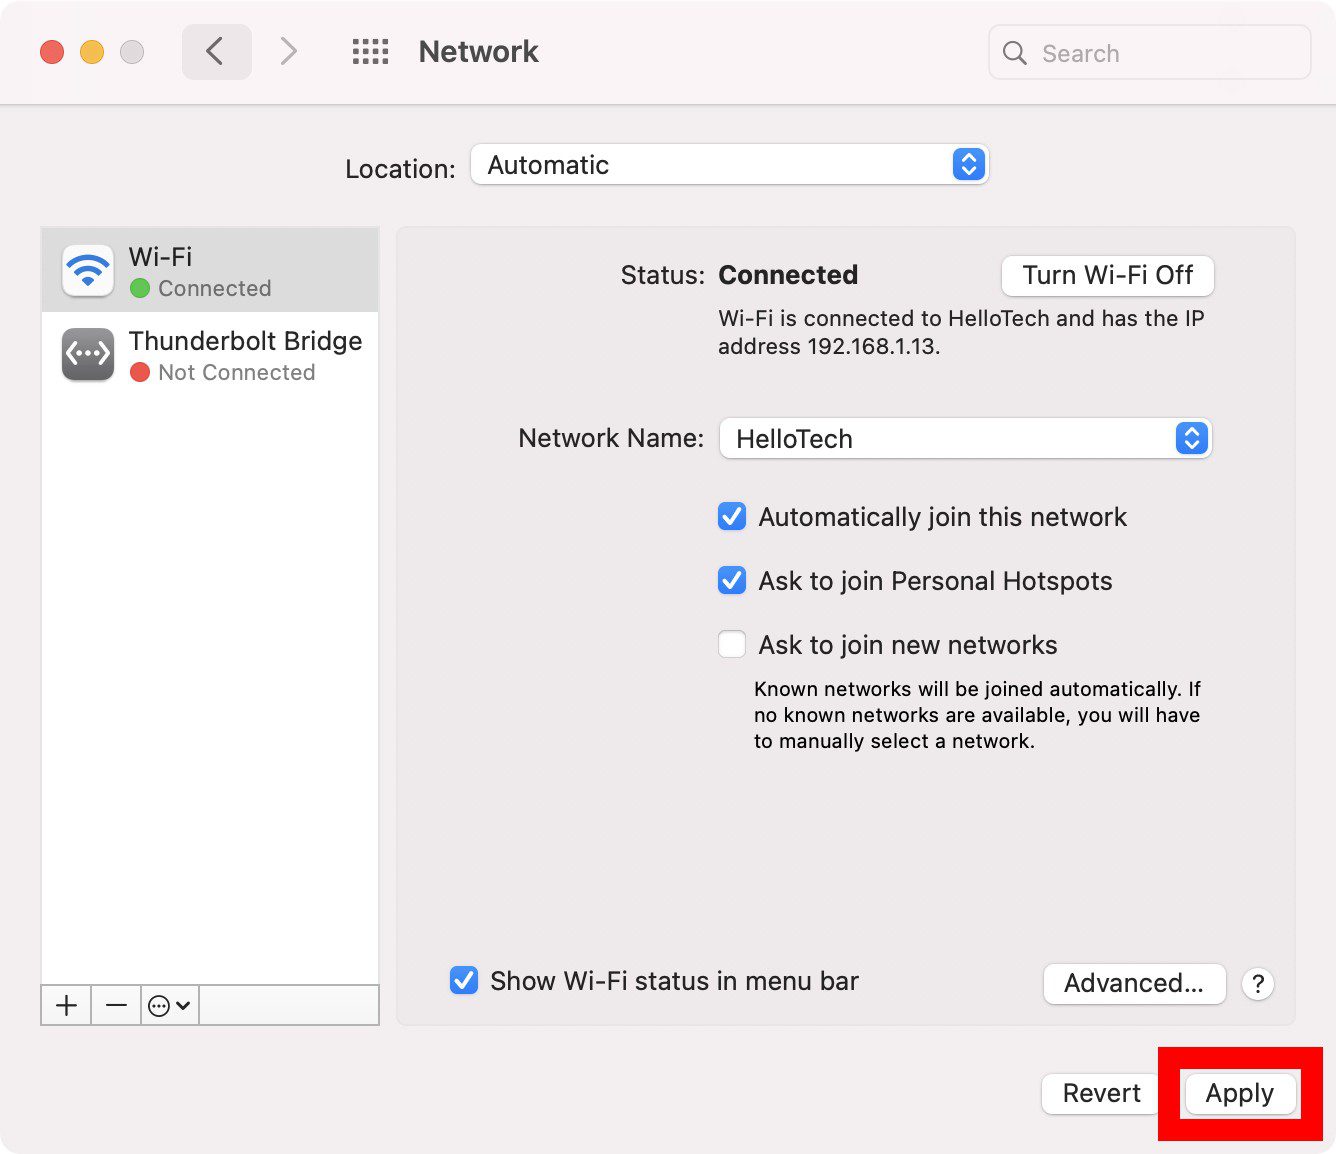
- Finally, click on Apply. Your changes won’t go into effect until you click Apply in the Network window.
Now that you know how to change your DNS address on a Windows 10 and Mac computer, here are the best third-party DNS addresses you can use.
Which Third-Party DNS Server Should You Use?
If you want to use a third-party DNS server, some of the best options are the Google Public DNS, Cloudflare, and OpenDNS. Each of these providers has a primary and secondary DNS address that you can use.
- Google Public DNS: 8.8.8.8 and 8.8.4.4
- Cloudflare: 1.1.1.1 and 1.0.0.1
- OpenDNS: 208.67.222.123 and 208.67.220.123
Google’s Public DNS is one of the most popular addresses because it is so easy to remember. However, it is important to note that Google does keep a log of the IP addresses that use its servers for one to two days to help with diagnostics and troubleshooting. There could also be some long-lasting logs, but Google claims that it doesn’t store any personal information. So, if you care about privacy, you might want to use another DNS address.
Cloudflare is also a popular choice because of the speed and privacy it offers. Cloudflare promises that it won’t use your data or log your IP address. There’s also a 24-hour deletion system wherein data gets removed on a daily basis. Cloudflare also has an active community forum that you can rely on any time you have questions about its services.
OpenDNS is a fine choice if you want an experienced DNS provider. It blocks phishing sites by default, and you can configure parental controls for free by visiting its website. OpenDNS also offers commercial plans that come with a bunch of other great perks, such as access to up to one year of your internet activity history.
Since all of these DNS servers are in the US, they all let you access content that might be blocked in another country. If you want a more reliable way to access blocked content and protect your privacy online, check out our list of the best VPN services.
