
With a Ring Video Doorbell, you can see who’s at your door from anywhere in the world. But this smart home device can do a lot more than you think. Whether you just got a new video doorbell or you’ve had it for a while, here are some of the best settings you should change in the Ring app.
Before you begin, it’s important to note that some of these features are only available on newer Ring Doorbell models. Also, some of these features will require you to pay for a Ring Protect monthly subscription.
If you need help setting up your Ring Video Doorbell or changing any settings, you can always contact HelloTech. We have thousands of technicians across the country who can come to your home and provide you with personalized support for your video doorbell.
How to Change Settings on Your Ring Video Doorbell
To change settings on your Ring Video Doorbell, all you need to do is open the Ring app and tap the three-line “menu” icon in the top-left corner of your screen. Then go to Devices and select your Ring Video Doorbell from the list of connected devices.
Alternatively, you can tap the gear icon located in the top-right corner of your video doorbell’s live view on the Dashboard right when you open the Ring app.
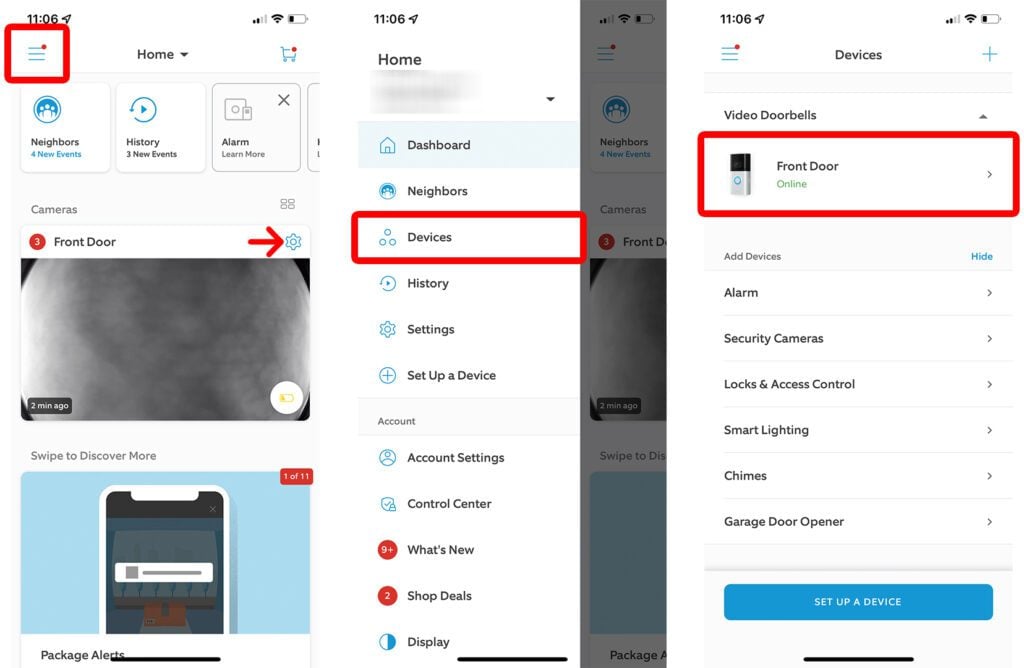
When you tap on the three-line icon in the top-left corner, you can also change other settings under Account Settings and Control Center. Selecting Account Settings lets you quickly change your name, email, and password.
Under Control Center, you can make all those changes, plus you can add users to your account, change video settings, and more. If you scroll all the way down, you will see a way to contact customer support if you forget your password or have any other questions about your device.
Tip 1: Stop Unwanted Alerts with Motion Zones
One of the first things you should do when you get a Ring Video Doorbell is set up Customizable Motion Zones. With this feature, you can focus your doorbell’s camera on certain areas of your property, so you don’t get unwanted alerts every time a car drives down the road.
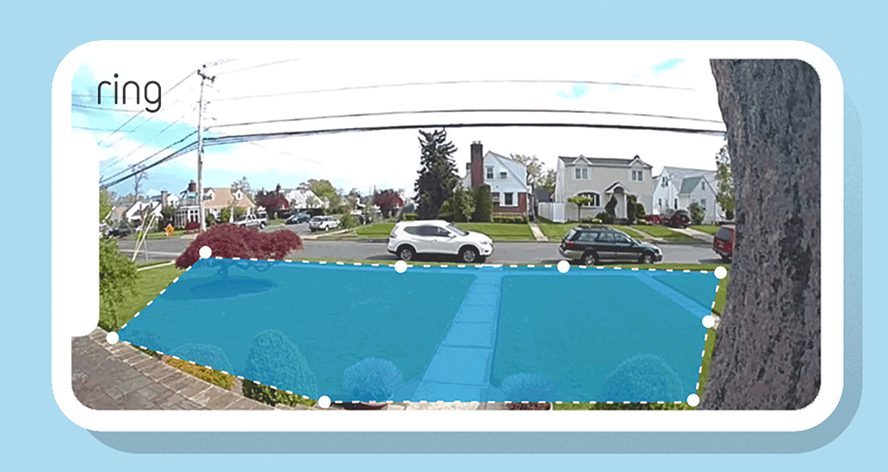
Without this feature, you might get too many notifications. Then this could lead to you ignoring your notifications and missing something that’s actually important. You might also want to block out trees, plants, and any other objects that might move in the breeze.
How to Set Up Motion Zones in the Ring App
To set up a Customizable Motion Zone, open the Ring app and tap the three-line icon in the top-left corner. Then go to Devices and select your Ring Video Doorbell. Next, go to Motion Settings > Camera Motion Zones. Finally, select Default Zone to create a new motion zone.
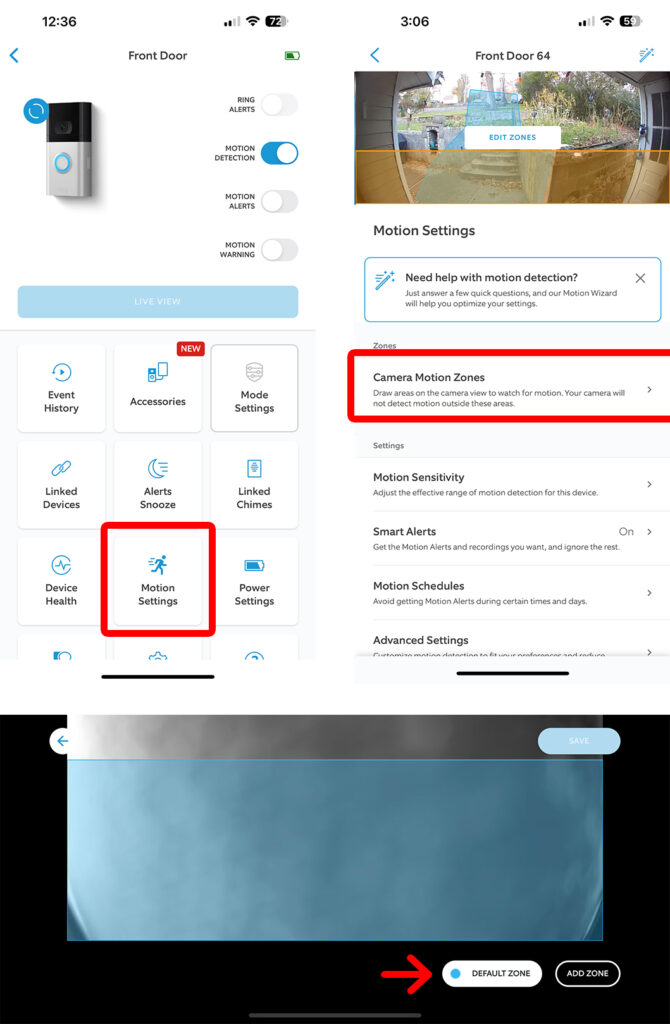
After you select a zone, drag the circles at the edge of the colored area to edit it. Once the circles are around the area you want to capture, tap Done > Save. Then you will only receive alerts when motion is detected within that zone.
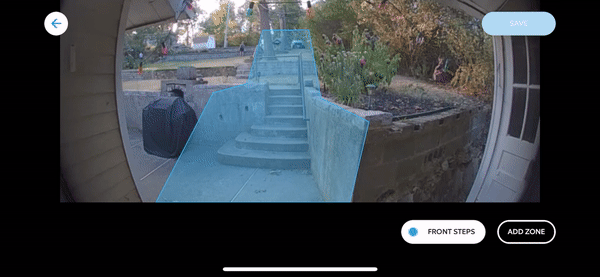
You can add up to three different motion zones by tapping Add Zone in the bottom-right corner. Once you select a zone, you can also rename it by deleting the old name and typing in a new one. Then the zone name will appear in your notifications, so you will always know exactly where the motion was detected.
Tip 2: Set Areas as “Off Limits” with Privacy Zones
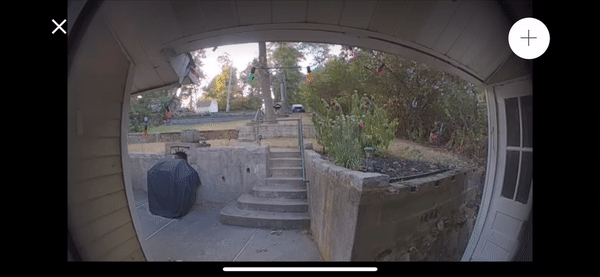
If you don’t want to receive motion alerts for certain parts of your property, you can manually block out any area from your Ring Video Doorbell with Privacy Zones. Once you create a Privacy Zone, you won’t be able to see anything in that area, and no video will be recorded or recoverable.

This feature is a good way to give your neighbor some privacy if your doorbell is looking into their yard or windows. You can only create up to two privacy zones, and those areas will be totally blacked out.
How to Set Up Privacy Zones in the Ring App
To set up a Privacy Zone on your Ring Video Doorbell, open the Ring app, tap the three-line icon in the top-left corner, and select Devices. Then choose your Ring Video Doorbell and go into Device Settings > Privacy Settings > Add Privacy Zone.
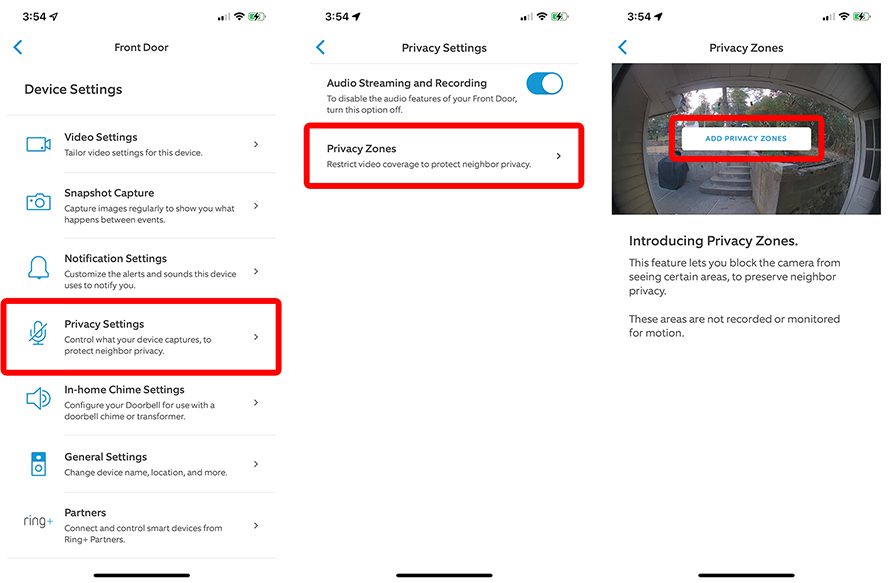
Then tap the plus sign icon in the top-right corner and drag out the area you want to block out. Finally, tap Done to save the zone. You can only create rectangular privacy zones. Once you set up a privacy zone, you can tap the name to change it.
If you move your video doorbell, the Privacy Zone will remain in the same spot. Basically, you can think of a Privacy Zone like putting a piece of tape over your camera to block out an area from being filmed. So, if you move your doorbell, you will also have to move the Privacy Zone.
Tip 3: Use Quick Replies to Leave a Message
Quick Replies (also known as Alexa Greetings on some devices) is a feature that lets you turn your Ring Video Doorbell into an answering machine. So, when someone rings your doorbell, Alexa will answer with a pre-recorded message, and then your visitors can also leave you a video message.
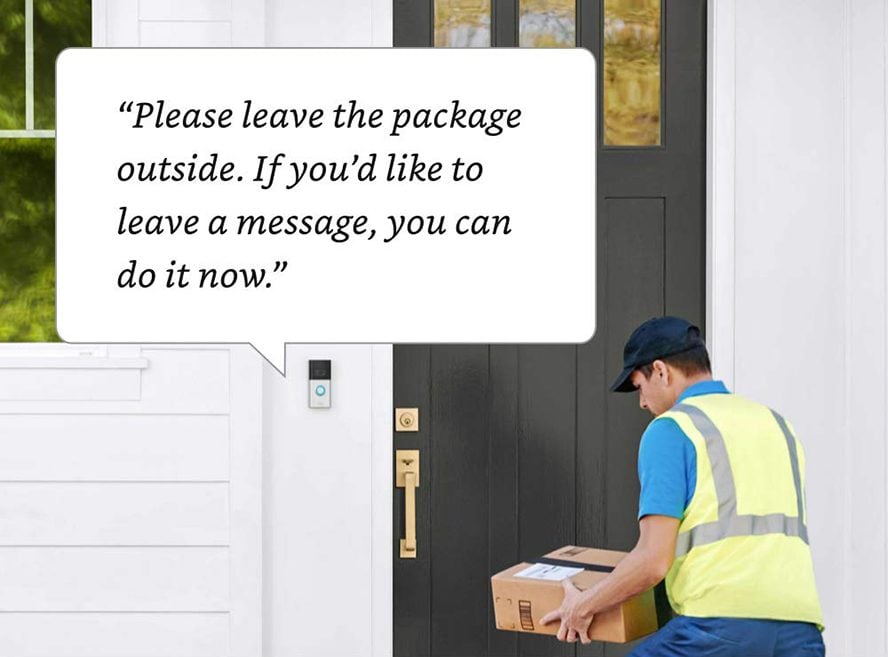
This feature is perfect for when you can’t come to the door or when you just want the delivery driver to leave your package outside. You don’t need a Ring Protect plan to use this feature, but you won’t be able to watch recorded videos without a membership.
How to Set Up Quick Replies in the Ring App
To set up Quick Replies on your Ring Video Doorbell, open the Ring app and tap the three-line icon in the top-left corner. Then go to Devices, select your Ring doorbell, and go to Smart Responses. Finally, tap the slider next to Quick Replies to enable it.
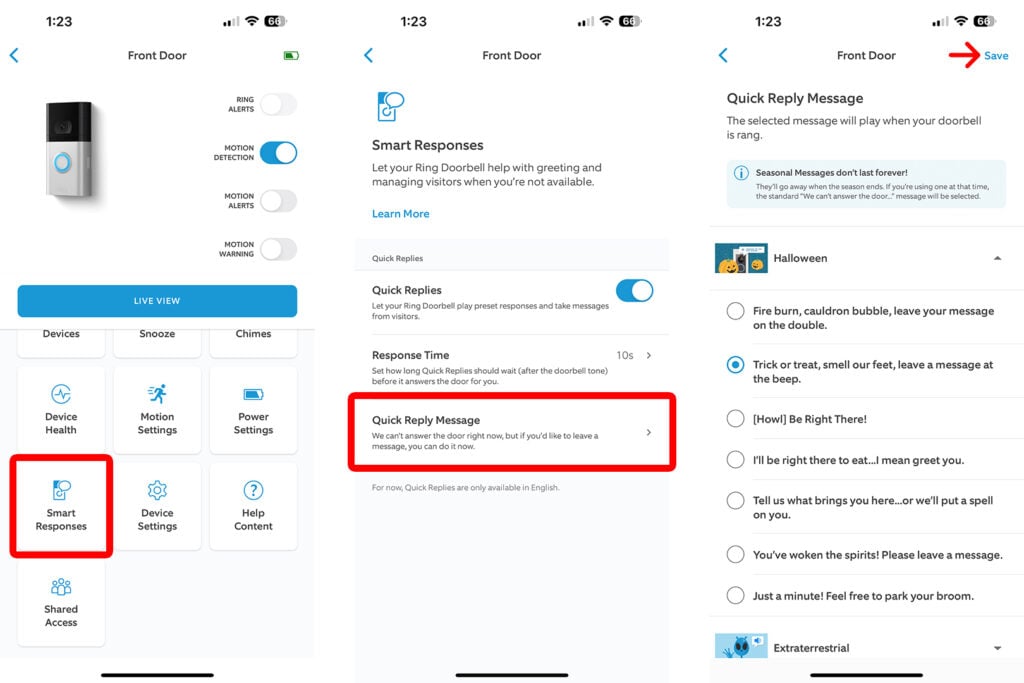
After you enable Quick Replies, tap Response Time to choose how long you want it to take from the time your guest rings your doorbell until Alexa plays your pre-recorded message. The message will only play if you do not answer your door within that time period.
Then select Quick Reply Messages to choose what you want Alexa to say to your guests when they ring your doorbell. Unfortunately, Ring does not allow you to create your own Quick Reply messages, but you can choose from several holiday themes. Finally, tap Save in the top-right corner.
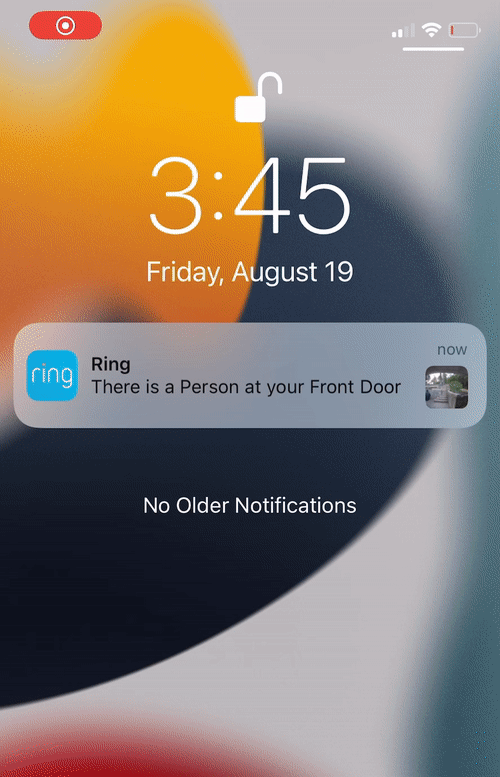
Tip 4: Check Alerts Faster with Rich Notifications
With Rich notifications, you will get a snapshot of what triggered your Ring Video Doorbell’s motion detectors. This way, you don’t have to open the app and watch a video every time you want to see what’s going on outside your front door.
Pro Tip: Rich notifications also work with the Apple Watch, making it much easier to see who’s at your door.
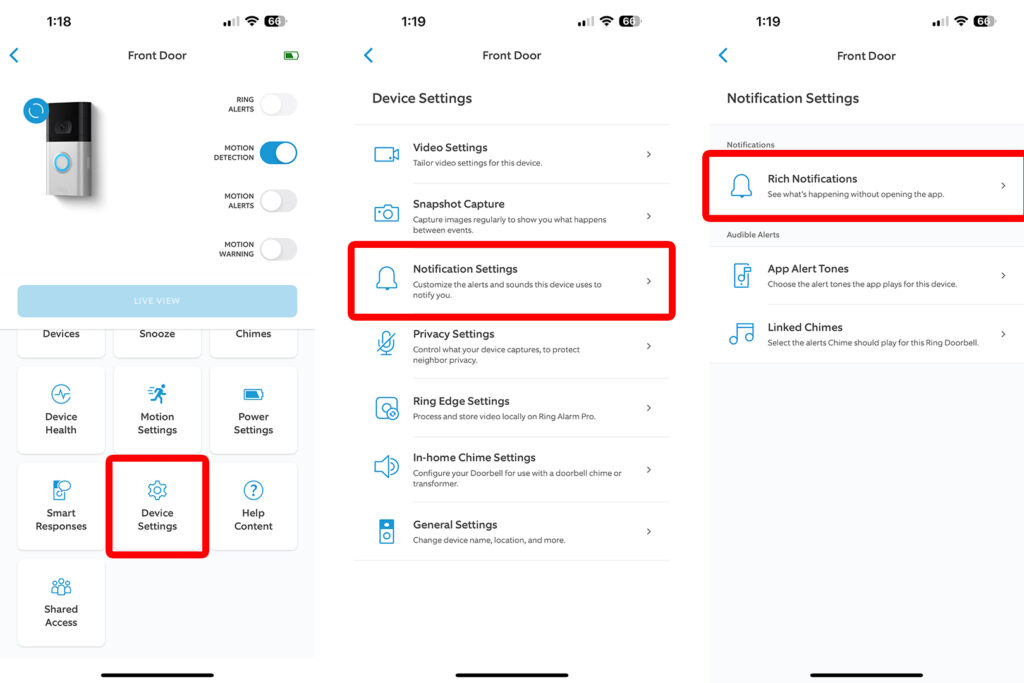
How to Enable Rich Notifications in the Ring App
To enable Rich Notifications on your Ring Video Doorbell, open the Ring app and tap the three-line icon in the top-left corner. Then select Devices and choose your Ring Doorbell. Next, go to Device Settings > Notification Settings > Rich Notifications and tap the slider to enable it.
If you are using an iPhone, you can tap and hold a notification, and a snapshot of the event will pop up. If you are using an Android device, drag down the thumbnail of the image to see the full snapshot.
Tip 5: Download and Share Videos Quickly
One of the best parts about owning a video doorbell is the fact that you can download and share your video recordings with friends, family, or the police. It is important to know how to do this because Ring will not save your video recordings in the cloud for more than 60 days by default.
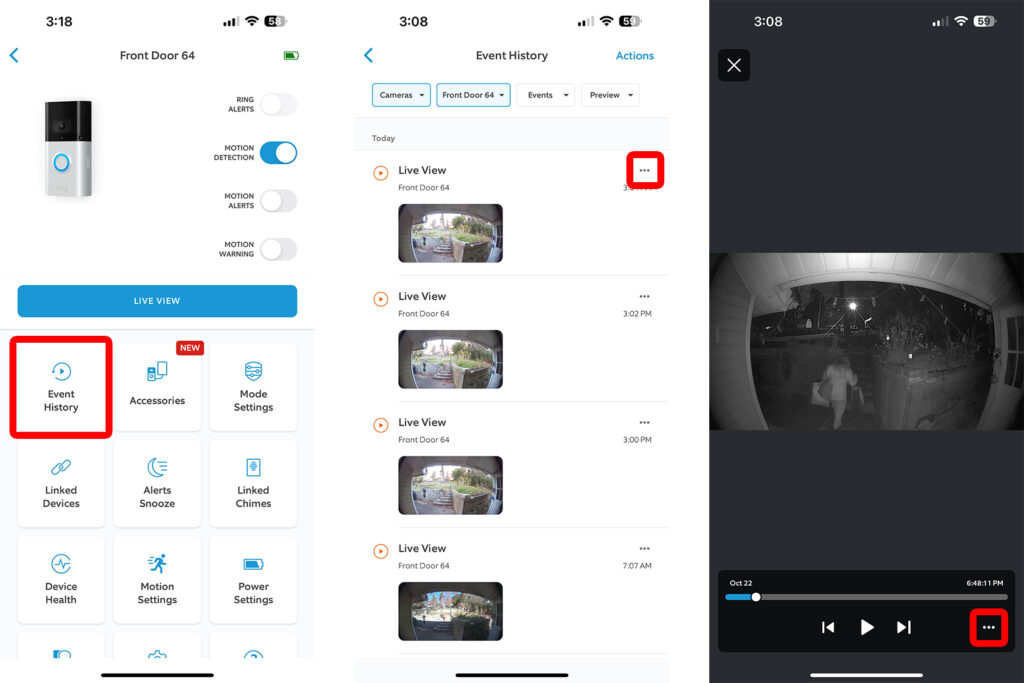
How to Download and Share Videos in the Ring App
To download and share videos from your doorbell, open the Ring app and tap the three-line icon in the top-left corner. Then go to Devices, select your Ring Video Doorbell, and tap Event History. Finally, select an event and tap the three-dot icon in the bottom-right corner.
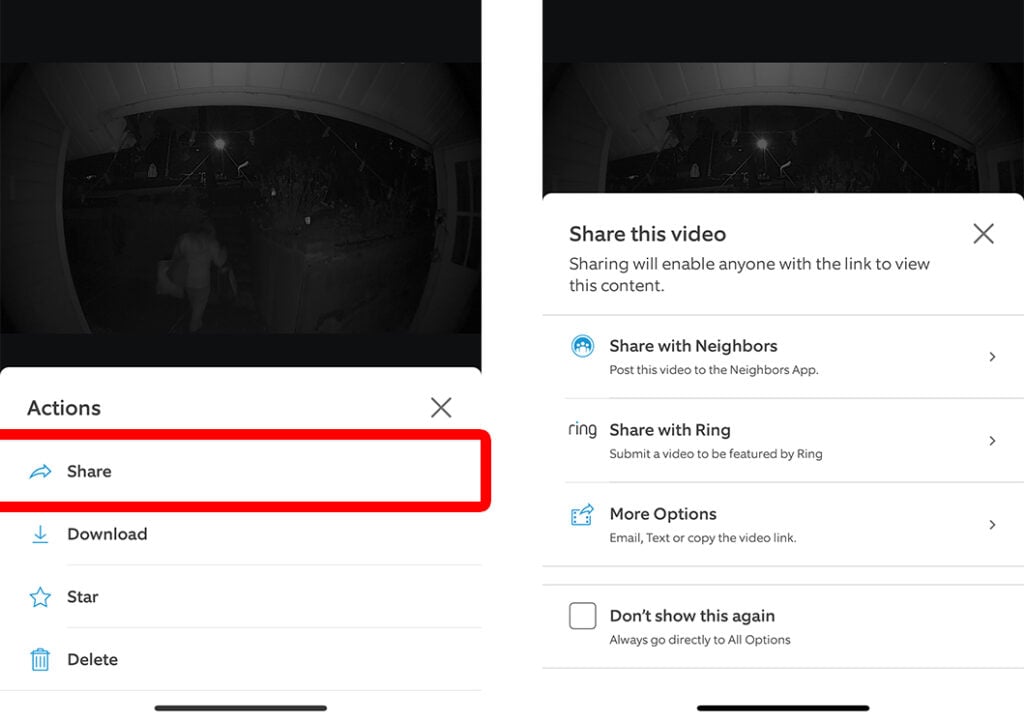
From here, you will see a pop-up menu where you can share, download, favorite, or delete any clips. If you select Share, you can send the clip via email or text message. You can also upload your clip to the Neighbors app, which will share your video with other Ring users in your area.
If you choose Download, your video will be downloaded to the photos app on your device. If you choose Star, you will be able to quickly find that clip in the future by going back to the Event History page in the Ring app and selecting the star icon in the top-right corner.
For additional protection, you might also want to link your Ring Video Doorbell with other smart home devices. HelloTech offers the latest smart home devices, and our technicians can come to your home to install your smart home security system for you as soon as today.
Tip 6: Extend Your Video Storage Settings
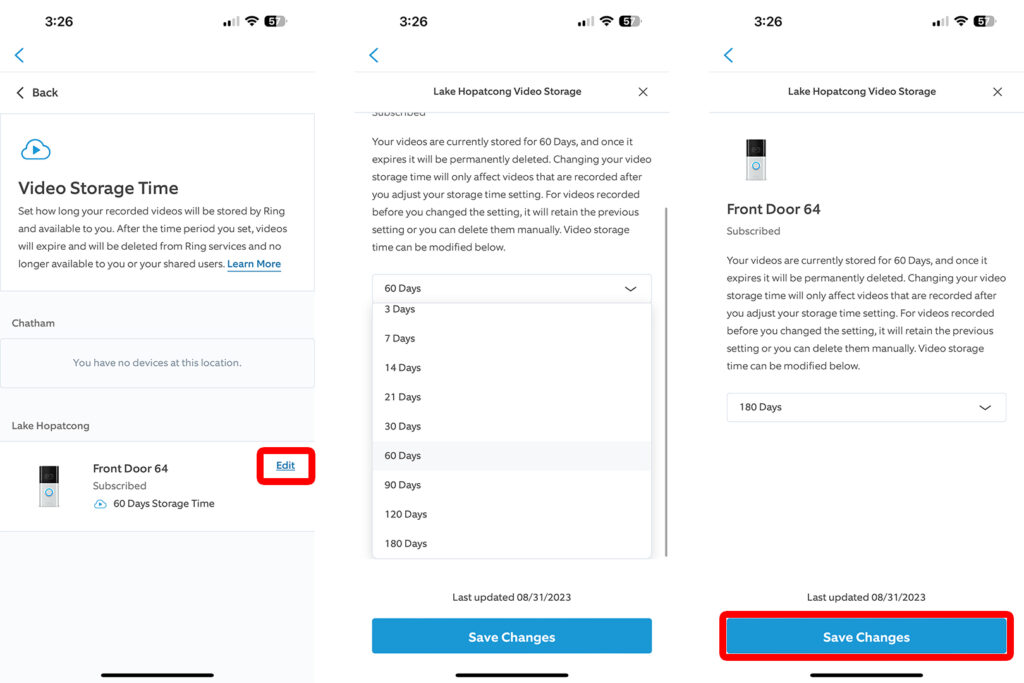
As long as you have a Ring Protect membership, you get up to 180 days of cloud storage. However, you can only store your videos on Ring’s cloud servers for 60 days by default. All you have to do is change the Video Storage Time setting in the Ring app to triple how long your clips are saved.
How to Change Your Ring Doorbell Storage Settings
To extend how long your Ring Video Doorbell’s recorded footage is saved in the cloud, open the Ring app and tap the three-line icon in the top-left corner. Then go to Control Center > Video Management > Video Storage Time.
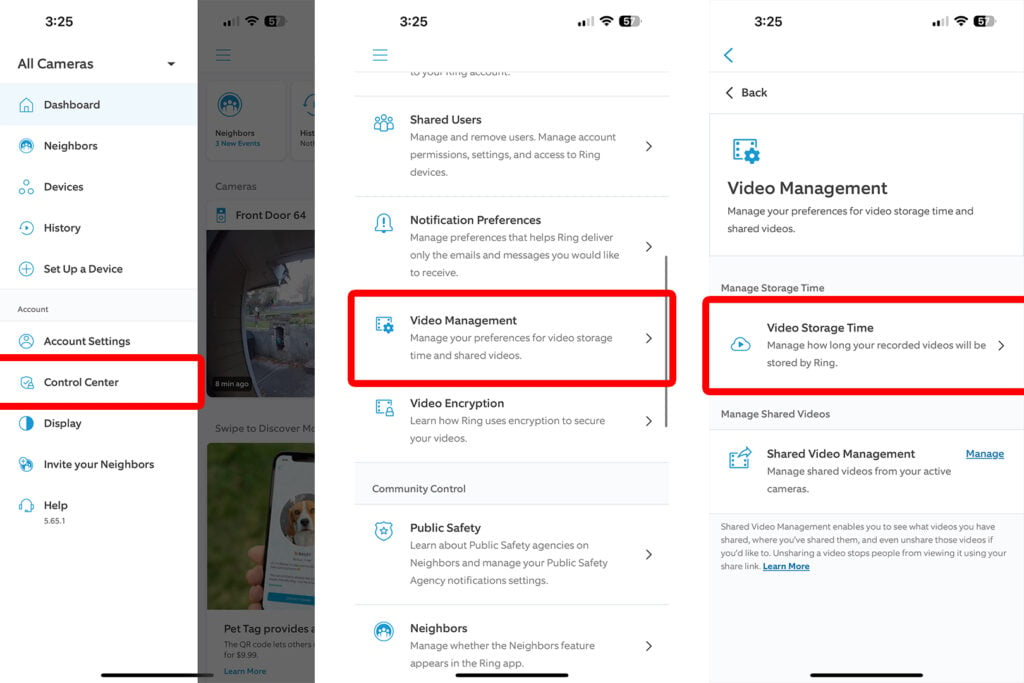
From here, tap Edit at the bottom of your screen next to your Ring Video Doorbell. Then select the drop-down menu and choose how long you want to save your video clips to the cloud. Finally, don’t forget to tap Save Changes at the bottom of your screen.
It’s important to note that changing this setting will only save videos for longer if they were recorded after you changed the setting. Also, if you have more than one Ring Video Doorbell, you will have to repeat these steps for each of them individually.
Tip 7: Optimize Your Ring Doorbell Battery
According to Ring, your video doorbell battery should last between 6 to 12 months before you need to recharge it, but you can make yours last longer if you change a few settings. This can help if you are away from home and can’t change the battery before it dies.
How to Make Your Ring Doorbell Battery Last Longer
To make your Ring Video Doorbell’s battery last longer, open the Ring app and tap the three-line icon in the top-left corner. Then tap Devices, select your doorbell, and go to Power Settings. Finally, choose an option under Feature Power Usage, change the settings, and tap Save.
On the Power Settings page, you will also see how much charge your battery has with an exact percentage.
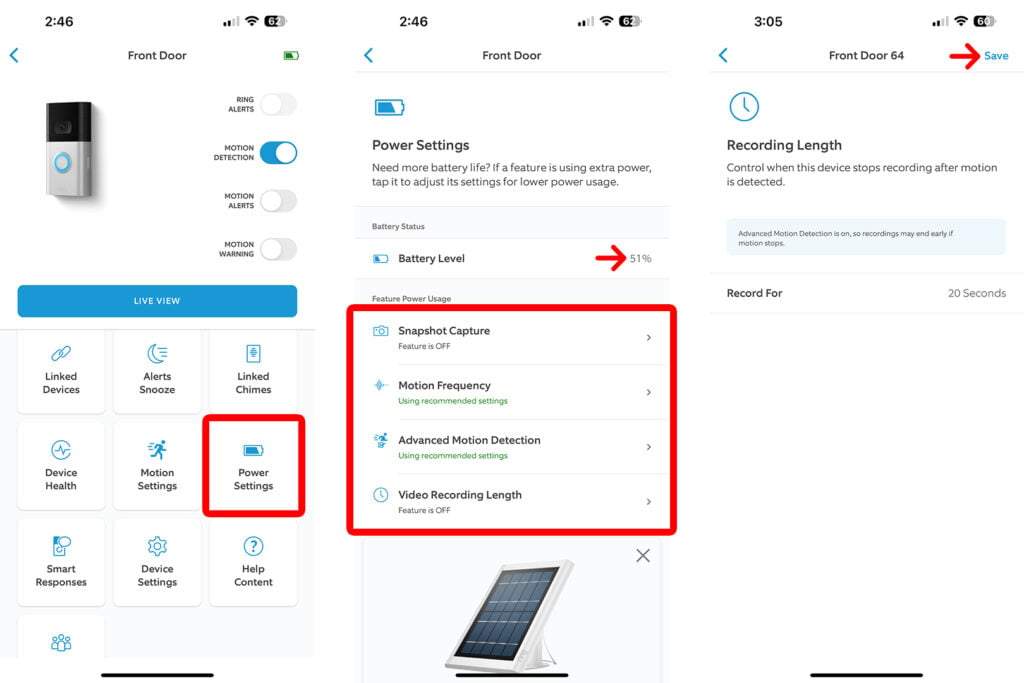
- Snapshot Capture takes a picture every few seconds, minutes, or hours, so you can get a better idea of what’s happening on and around your property. To increase the battery life of your Ring Doorbell, just increase the time between snapshot captures or turn off the feature entirely.
- Motion Frequency means how long it takes for your Ring Video Doorbell to check for motion after sending you an alert. If your motion detector is turned on all the time, it will shorten your battery life. To increase your battery life, you can make your Ring Video Doorbell take a break after each motion alert.
- Advanced Motion Detection allows you to create customizable motion zones. If you turn this off, your doorbell will actually use more battery because it will have to notify you every time it detects motion anywhere in the camera’s entire field of view.
- Video Recording Length lets you increase the battery life of your Ring Video Doorbell. The shorter your recordings are, the longer your battery will last.
Tip 8: Use HDR to Capture More Details on Your Ring Doorbell
Some newer Ring Video Doorbells have a feature called HDR (high-dynamic range), which will enhance your videos and bring out a lot of details that would normally get lost in bright and dark areas. However, enabling HDR will also reduce the battery life of your Ring Doorbell.
How to Enable HDR on Your Ring Video Doorbell
To enable HDR on your Ring Video Doorbell, open the Ring app and tap the three-line icon in the top-left corner. Then tap Devices and select your Ring Doorbell. Next, go to Device Settings > Video Settings and tap the slider next to HDR.
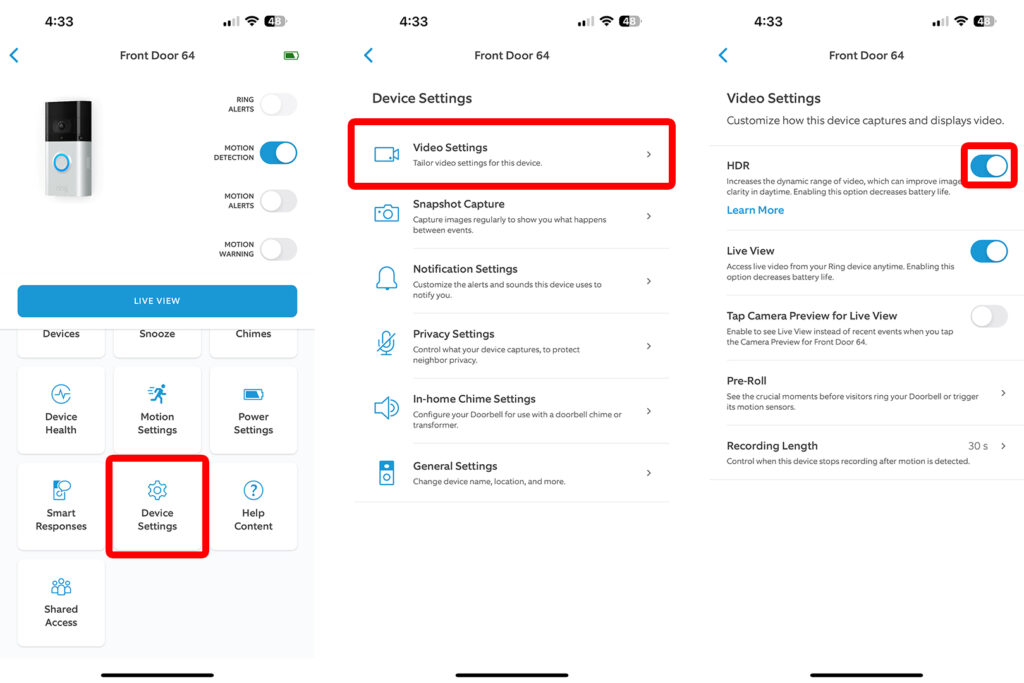
On this screen, you can also turn on Pre-Roll to see what happens a few seconds before your doorbell detects motion.
If you are still having issues with your Ring Video Doorbell, we are always here to help. With a HelloTech Home membership, you can get unlimited and instant support for any of your smart devices, as well as 24/7 online support, free home technology checkups, and much more!

HelloTech editors choose the products and services we write about. When you buy through our links, we may earn a commission.

