
Newer Macs rely more on flash storage. Not only that, if you go for those computers with higher local storage capacity, you will most likely be faced with a steeper price. As such, Mac users are well aware that storage tends to run out sooner than later. For all of you out there who are always lamenting the lack of storage on Macs, the macOS Sierra can ease your troubles!
How Does the macOS Sierra Optimize Storage?
Apple, to their credit, recognized just how frustrating it is to see that pop-up bearing a warning that “your disk is almost full.” To remedy the problem, a host of features were made available on the macOS Sierra to make it easy to free up space.
The new and improved operating system will save to the cloud any seldom used files, including images and videos. It can do this in the background automatically. Using those files won’t be a hassle because they will automatically download onto your system the moment you open them. No need to hunt for them in the cloud; the whole process is pretty streamlined.
Displayed Available Space = Free Space + Purgeable Space
In previous Mac OS iterations, the Storage bar provides a more general, color-coded overview of what’s taking up space on your computer, and how much free space (denoted by the white part of the bar) is available.
macOS Sierra, however, takes a more detailed approach to the displayed available space. It now identifies two components – Free Space and Purgeable Space. The former is basically storage with no data in it, which is free for you to add files to anytime. The latter, meanwhile, is the space composed of those rarely used files, music/movies you barely listen to or watch and can easily be loaded from the iTunes, and infrequently opened photos.
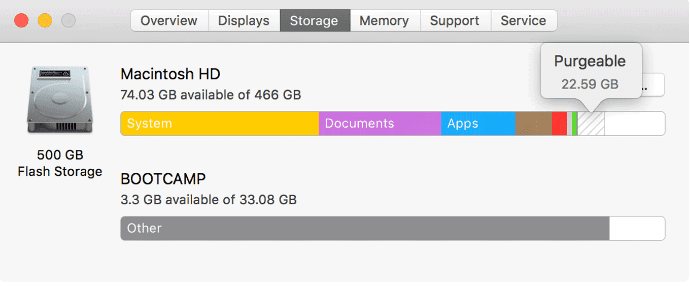
The OS adds up these two types of spaces and then displays the result as the whole available storage. To demonstrate, say you have 30 GB of “Free” space and 15 GB of “Purgeable” space. Your total available space then is 45 GB.
The best part here is that if you are to add a 40 GB file into your computer now, it will still be stored even if, technically, the free space is just 30 GB. As mentioned above, macOS Sierra will simply relegate those Purgeable files onto the cloud. Again, they are still there easily within reach in case you need them in the future.
How to Activate macOS Sierra’s Space Saving Features
Activation isn’t complicated at all. The first step is to go to the Apple menu denoted by the company’s well-known logo. Once there, select “About This Mac.” You should then see the storage bar, letting you know the different file categories inside your system.
Look for the “Manage” button. Clicking it will show you a menu of recommendations on how to optimize your machine’s storage. These four options will prove to be super useful for any storage space concerns in the future.
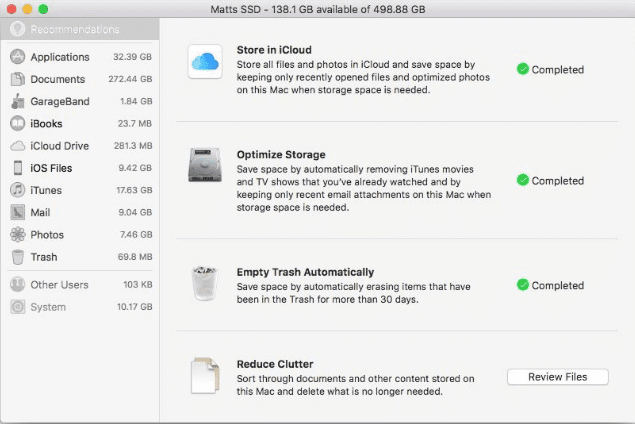
Option 1 – Store in iCloud
Turning this feature on allows you to save files from “Desktop and Documents” into your iCloud Drive. You’ll know if a file is on the cloud when you see that download icon. Press that to access any of your iCloud Drive files. As for recently used files, they’ll stay in your local storage.
The iCloud storage option also works for photos and videos, which will be stored in the “iCloud Photo Library.” When space is running low, “optimized” versions of those images and clips will be the default you can access. This means that resolutions may be affected or lowered in favor of freeing up space. However, you can still download the original photos and videos from your iCloud.
Take note, by the way, that storing stuff on iCloud will consume the allotted space in your iCloud storage plan. Make sure you manage this properly to avoid surprises.
To tweak the iCloud settings, click on the Apple menu, then choose “System Preferences.” Find and click “iCloud,” then press the “Options” button beside “iCloud Drive.”
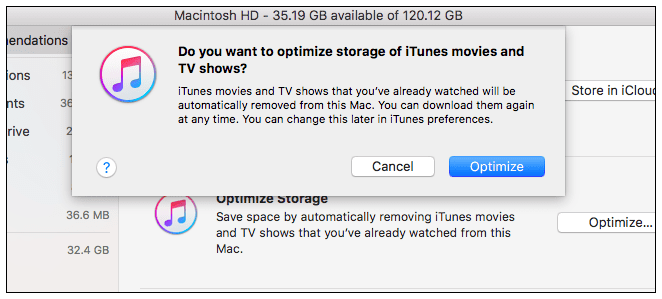
Option 2 – Optimize Storage
This feature, once activated, will trigger the automatic deletion of movies and TV shows you already watched from iTunes. You can re-download these shows via the download icon.
Aside from that, the operating system also streamlines your mail. Only recent attachments can be automatically downloaded whereas old ones stay online. Alternatively, attachments can only be downloaded when you actually open the mail or the corresponding attachment. Manually opening attachments from any period in your mail history is easily done by clicking on them or saving them on your local storage.
For setting up Optimize Storage parameters for iTunes, open “Preferences” within iTunes. Then hit “Advanced,” where you can set to “Automatically delete watched movies and TV shows” once option two is activated. To do the same within Mail, open “Preferences” again, and then select “Accounts.” Within the “Account Information” area, set “Download Attachments“ to “Recent” or None.“
Option 3 – Empty Trash Automatically
Deleting files normally will entail a saved copy in your computer’s Trash bin, just in case you decide to restore these files later. Unfortunately, these contribute to storage shortage. No need to let this bother you though because macOS Sierra can automatically delete unneeded Trash files.
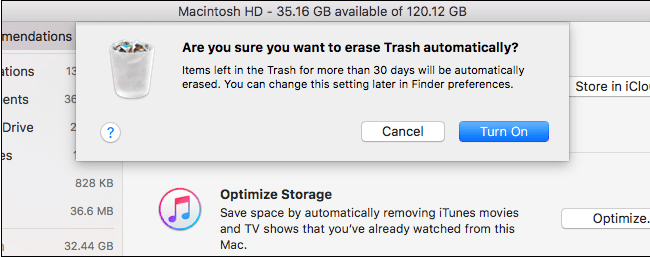
To access this feature’s settings, go to “Finder,” then “Preferences.” Click “Advanced” and you should see “Remove items from the Trash after 30 days.” Select that. Once option 3 is triggered, the computer will sift through your Trash folder regularly to forever purge those old, deleted files.
Option 4 – Reduce Clutter
Cleaning your system of unused files will do wonders for your storage availability. There is really no need to hoard those old TV series episodes or those once-trendy music files that you’ve forgotten. Let macOS Sierra help you figure out which files you don’t need anymore so you can delete them.
Simply click “Review Files.” You will see various file categories on the sidebar; select whichever you want to clean up first. Files will show up and you will see an X button beside them, signaling that they can be deleted right there. Deletion is permanent unless those files were purchased from the app store.
Some folders will have no X button, though, but they will show the file size. If you see a folder taking up so much space, you may want to open it and clear out anything you don’t need from there.
Extra Assistance
Aside from all of the helpful options above, macOS Sierra exceeds expectations in the space-saving department by automatically deleting duplicate Safari downloads and old languages, dictionaries, and fonts. The operating system also gets rid of caches and other dispensable data once storage space runs low. It will even remind you to purge used app installers.
Overall, the macOS Sierra is proving to be really helpful. Count on it to work tirelessly behind the scenes to extend your Mac’s local storage capacity as much as possible.

