
The average person now owns 22 devices that can connect to the internet, according to a recent Deloitte report. While these connected devices are designed to make your life easier, cybercriminals can also use them to breach your WiFi network and steal your personal information, such as your bank details. Here’s how to secure your home WiFi network and keep your data safe, so you can add as many connected devices as you want.
Why You Need to Secure Your WiFi Network
Every connected device in your home is like a window to your WiFi network. But some connected devices don’t have the best security features built in, and they rarely receive security updates. So, your entire WiFi network might be compromised by something as small as a smart plug.
According to the FBI’s latest Internet Crime Report, cybercriminals stole $6.9 billion from Americans in 2021 alone. Some of these cybercriminals are able to “crack” your passwords to access your email account, while others will steal your data to sell on the dark web or use it to extort you or your business.

In most cases, you won’t be able to secure all your connected devices individually. Instead, you just need to change a few settings in your router. However, all WiFi routers are different, and some of the following steps might use different names or paths, depending on your specific router.
If you have any problems with your router, you can always contact HelloTech. We have thousands of technicians across the country, so there’s always an expert in your area that can come to your home and troubleshoot any WiFi issues with you as soon as today.
How to Secure Your WiFi Network
To protect yourself online, you should create strong, unique passwords for all your routers and WiFi networks. You should also make sure you are using the latest WiFi encryption protocol, your router’s firmware is up to date, you have a separate network for guests, and your router’s built-in firewall is enabled.
1. Change Your Router’s Default Password
All WiFi routers come with preset passwords, but these are “easily available to obtain online” and “provide only marginal protection,” according to the Cybersecurity and Infrastructure Security Agency. So, when you get a new router, the first thing you should do is change its password.
By default, most WiFi routers come with usernames like “admin” and passwords like “password” because they are meant to be temporary. If you don’t know your router’s default login credentials, you can find them by searching your manufacturer’s website below.
| Router Model | Username | Password |
| Asus | admin | admin |
| Belkin | admin | (leave blank) |
| Cisco | admin, cisco | admin, cisco, or (leave blank) |
| Linksys | admin | admin |
| Netgear | admin | password, 1234, or (leave blank) |
| TP-Link | admin | admin |
| D-Link | admin | (leave blank) |
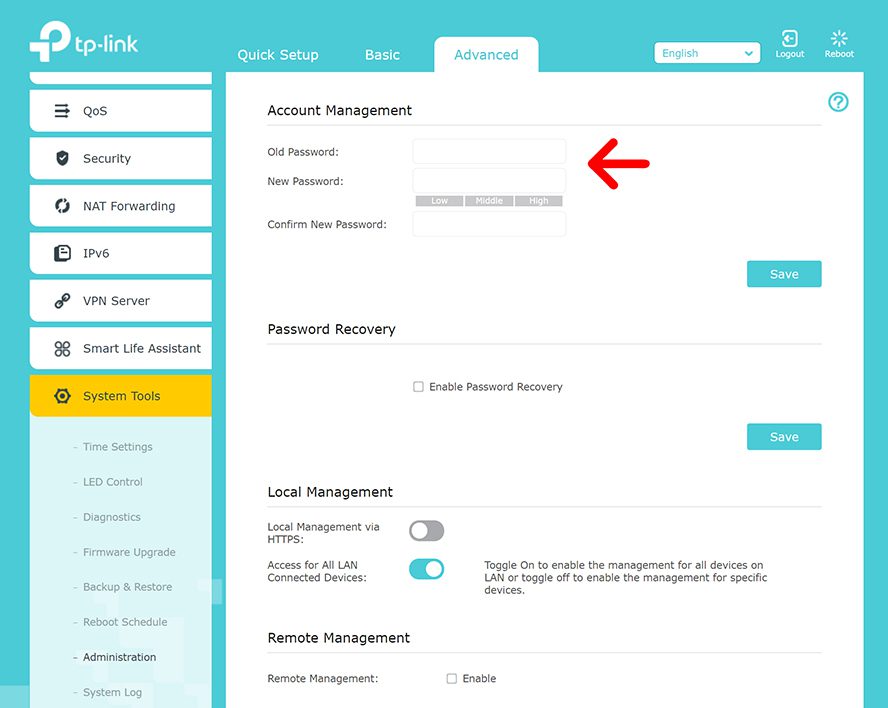
How to Change Your Router’s Username and Password
To change your router’s login password, type your router’s local IP address into any web browser. Then log in using your router’s current login credentials and go to Settings, Administration, or something similar. From here, you can change your password from the setting menu.
If you can’t find your router’s login information, try looking under the Advanced tab and then look for Access Control, Management, System Tools, Connectivity, or Maintenance.
Read More: How to log in to your router and change its password
It’s important to note that your router’s login information is different from your WiFi network’s name and password. Instead, these login credentials only allow you to sign in to your router, which then allows you to change your router’s settings (such as your WiFi password).
If you can’t remember your router’s login information, you can also reset it to factory settings. To do this, simply press and hold the “Reset” button on the back of your router for 30 seconds. However, this will also reset all of your settings, and you will have to set up your router from scratch.
Read More: How to reset your WiFi router to factory settings
2. Change Your WiFi Network Password
One of the easiest ways to secure your WiFi network is by changing your network’s name and password. You want to use a strong password for your WiFi network that’s hard to guess or crack, so don’t use any personal information about you or your router’s model name.

For even more safety, you might also want to hide your WiFi network name, so it doesn’t show up when strangers walk by your home. While this will not hide your network completely, hackers would need to know what your network is called before they can try to break in.
How to Change Your WiFi Name and Password
To change your WiFi network name and password, type your router’s IP address into the address bar of any web browser and log in to your router. Then you can usually find your WiFi network name and password under Wireless Settings or Advanced > Wireless Settings.
Your WiFi network name might also be called “SSID” (or Service Set Identifier), while your password might also be known as a “passphrase.” Once you find your network’s name and password, just type in a new one and make sure to click Save or Apply to change them.
Read More: How to change your WiFi name and password
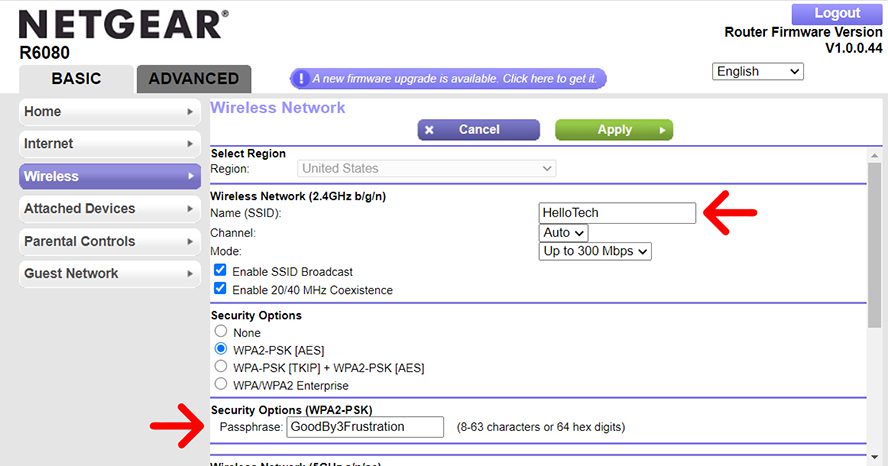
If you want to hide your network, you might need to un-check a box labeled “Broadcast Network Name,” “Enable SSID Broadcast,” or something similar.
It is also important to remember that many routers have more than one WiFi network. If you have a “dual-band” router, you will need to change the name and password for your 2.4GHz and 5GHz WiFi networks separately.
Read More: What is the difference between 2.4GHz and 5GHz?
3. Use the Latest WiFi Encryption
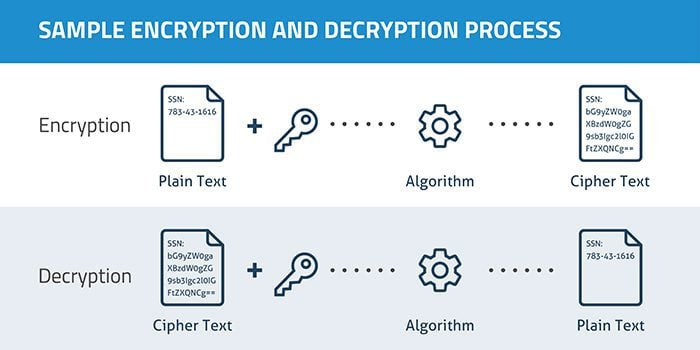
WiFi encryption turns all your online communications into “cipher text,” or a random jumble of letters and numbers. Then your data can only be turned back into legible text by a device with the corresponding decryption key. This way, cybercriminals won’t be able to read your data, even if they are able to intercept your communications.
There are four types of WiFi encryption protocols: WEP, WPA, WPA2, and WPA3. The latest encryption protocol is WPA3, and it offers the best protection for all your connected devices, even if your smart home devices don’t have the best security features or you aren’t using the strongest passwords.
However, WPA3 is only available on the latest routers, and it is only compatible with newer devices. If you can’t choose WPA3, the next most secure encryption protocol is WPA2, followed by WPA, and then WEP.
How to Configure Your Router to Use WPA3
To enable WPA2 or WPA3 encryption on your WiFi network, type your IP address into a search engine and log in to your router. Then go to Wireless or Advanced > Wireless Settings and use the drop-down menu next to Security or Authentication Mode to select WPA3 or WPA2.
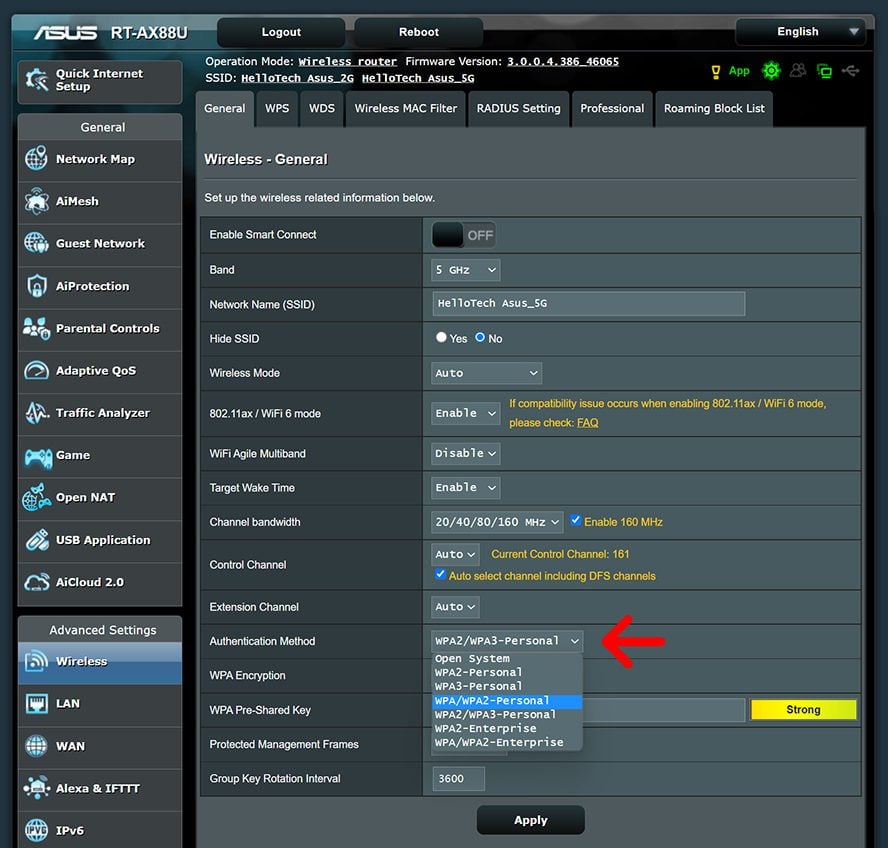
Depending on your router, you might see WPA3-personal and WPA3-enterprise. The difference between the two comes down to what type of network you have. You should choose “personal” for your home WiFi network and “enterprise” for the WiFi network at your place of work.
Remember that if you have a dual-band router, you can change the encryption protocols for your 2.4GHz and 5GHz bands individually.
Read More: How to change your WiFi security settings
4. Update Your WiFi Router Firmware
Cybercriminals are always coming up with new ways to hack routers. To stay ahead of them, you can update your router’s firmware, which will include new security patches. Since firmware is basically like your router’s operating system, updating it could also improve the performance of your WiFi network.
You can also choose to automatically update your router’s firmware, but this might also reset some of your settings, depending on your router.
How to Update Your Router’s Firmware
To update your router, type your router’s IP address into the address bar of any web browser. Then hit enter and log in to your router. Next, go to Settings or Advanced > Settings and click Check for Updates under the firmware or update tab. Finally, tap Update or Upgrade if it’s available.
Read More: How to update your router’s firmware
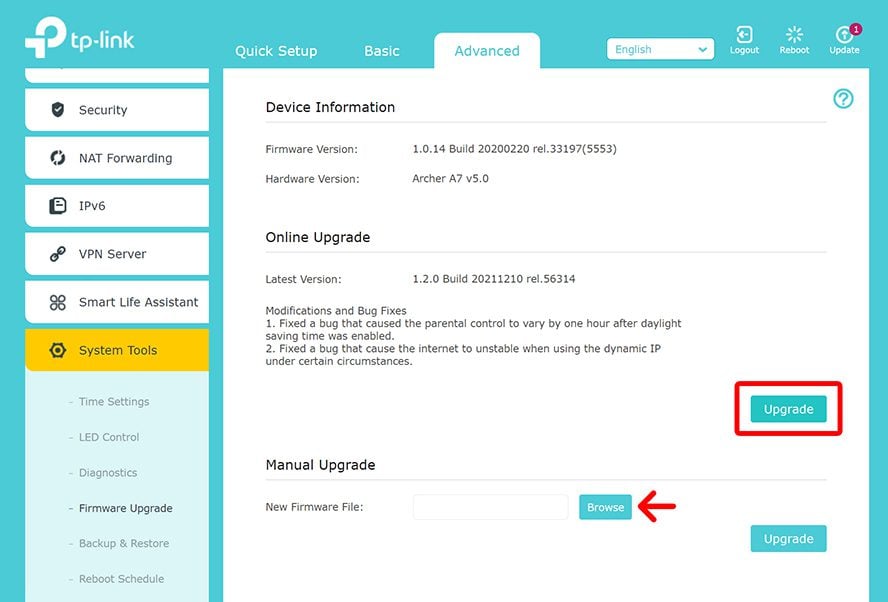
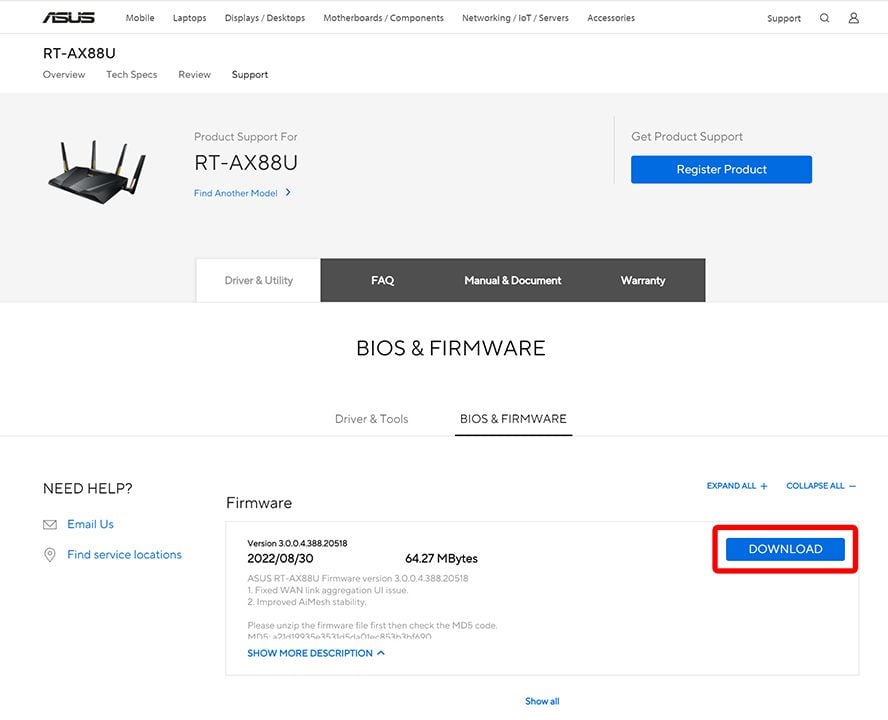
If you don’t see the option to update your router over WiFi, you might have to update it manually. To do this, click the “Browse” button, which should be located on the same page. Then you have to visit your router manufacturer’s website and download the firmware to your computer. When you hit browse, select the file and click Update or Upgrade.
If you are still having problems, try connecting your router to a computer with an ethernet cable before manually uploading it to your router.
Whether you’re looking to start a smart home security system or just improve your WiFi speed and range, HelloTech is here to help. With our home technology checkup service, we can send a technician to your home to check your WiFi speeds in every room, make sure you’re using the latest security protocols, and answer any other questions you have.
5. Create a Guest WiFi Network
These days, giving people your WiFi password is similar to giving them your house keys. Even if you trust the person, cybercriminals could hack their devices to gain access to your WiFi network. So, to be safe, you should create a guest network to stop anyone from accessing your personal data.
Essentially, a guest network is like a totally separate WiFi network. This way, you can make easy-to-remember passwords for your guests to access the internet, but you don’t have to worry about them accessing your real network with all your connected devices and personal information.
How to Create a Guest Network
To create a guest WiFi network, type your router’s IP address into the address bar of any web browser. Then hit enter and log in to your router. Next, go to Guest Network and create a network name and password. Finally, don’t forget to click Save or Apply to create the network.
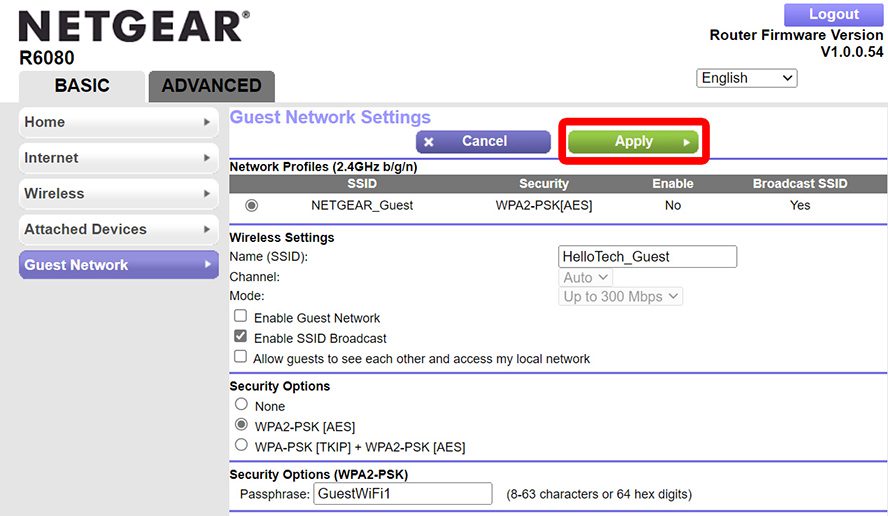
Depending on your router, you might also have to check boxes to allow guests to access your network. Unchecking these boxes allows you to quickly turn off your guest network when you don’t need it. However, it might be a good idea to keep it one and use it for all your smart home devices. This way, you don’t have to worry about your smart plugs compromising the security of your entire WiFi network.
If you have a dual-band router, you can also create two different guest networks for your 2.4GHz and 5GHz bands.
6. Disable Remote Access
Most routers allow you to configure your WiFi settings from anywhere in the world, but this also makes it easier for cybercriminals to hack your router remotely. By disabling remote access to your router, only devices that are directly connected to your network can make changes to your router configuration.
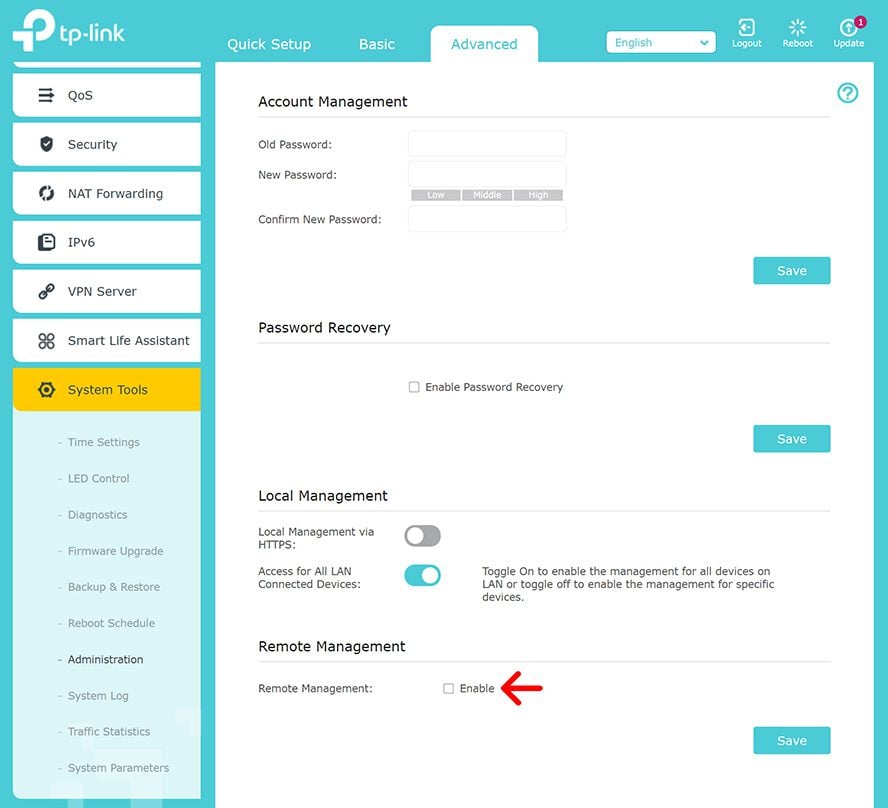
How to Disable Remote Access on Your WiFi Router
To disable remote access to your WiFi network, type your router’s IP address into the address bar of any web browser. Then log in to your router and go to Advanced Settings or Advanced > Administration, or something similar. Finally, uncheck the box next to Remote Access or Remote Management.
7. Turn on Your Router’s Firewall
Most routers come with built-in firewalls, which will protect your WiFi network by detecting and blocking incoming traffic from unsolicited and malicious sources. Unlike the firewall on your computer, your router’s firewall can secure all the devices connected to your WiFi network at once.
While this feature is enabled by default on a lot of routers, it has such an impact on your WiFi network security that you should check to make sure it is not disabled.
How to Enable your Router’s Firewall
To enable your router’s built-in firewall, type your router’s IP address into the address bar of any web browser. Then log in to your router and go to Firewall, SPI Firewall, or something similar. Finally, check the box next to Enable Firewall and click Save or Apply.
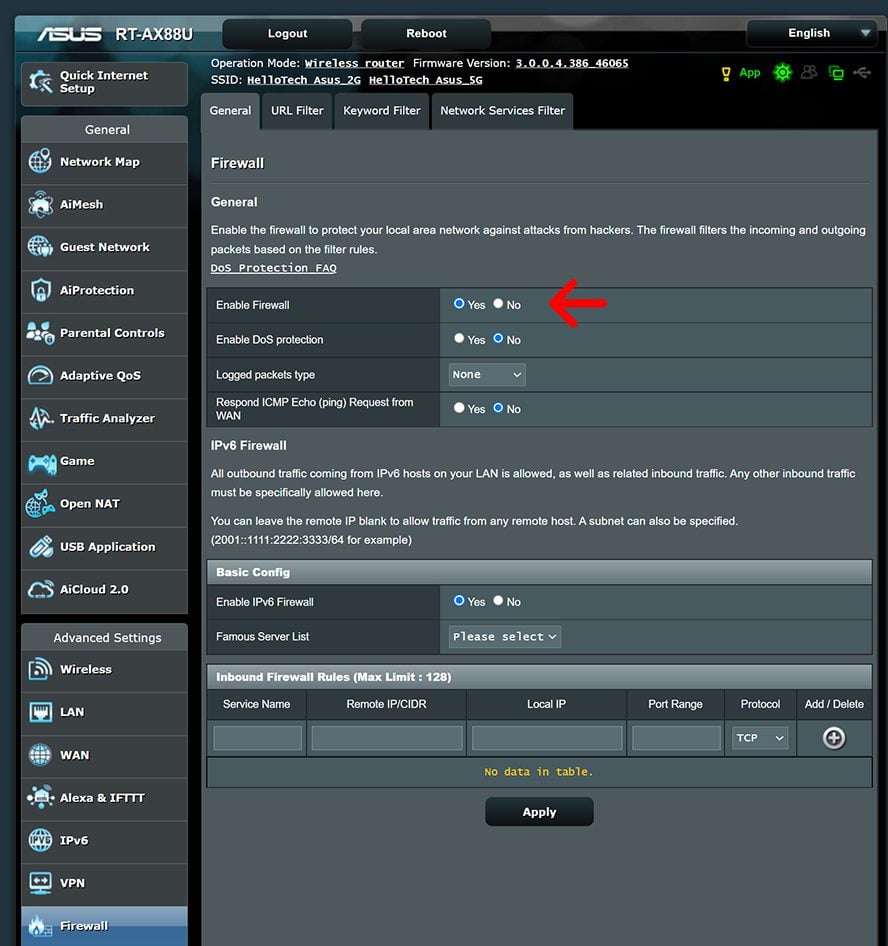
While there might be a lot of complicated settings to change on this page, you only have to worry about enabling your router’s firewall. You can leave the other options as they are.
8. Use a VPN to Hide Your Identity Online
A VPN (virtual private network) basically extends your private WiFi network over a public network, like the internet. More specifically, a VPN hides your IP address and encrypts your internet communications by directing your traffic through a remote server, so no one can see any data you send or receive online.
You can either use a free or paid VPN service by downloading an app or adding an extension to your web browser. However, many routers also come with VPNs built in, so you can simply turn them on to get most of the same benefits.
Read More: The best VPN services
How to Enable your Router’s VPN
To enable your router’s built-in VPN, type your router’s IP address into the address bar of any web browser. Then log in to your router and go to VPN or Security. Finally, check the box next to Enable VPN Server or something similar and click Save or Apply.
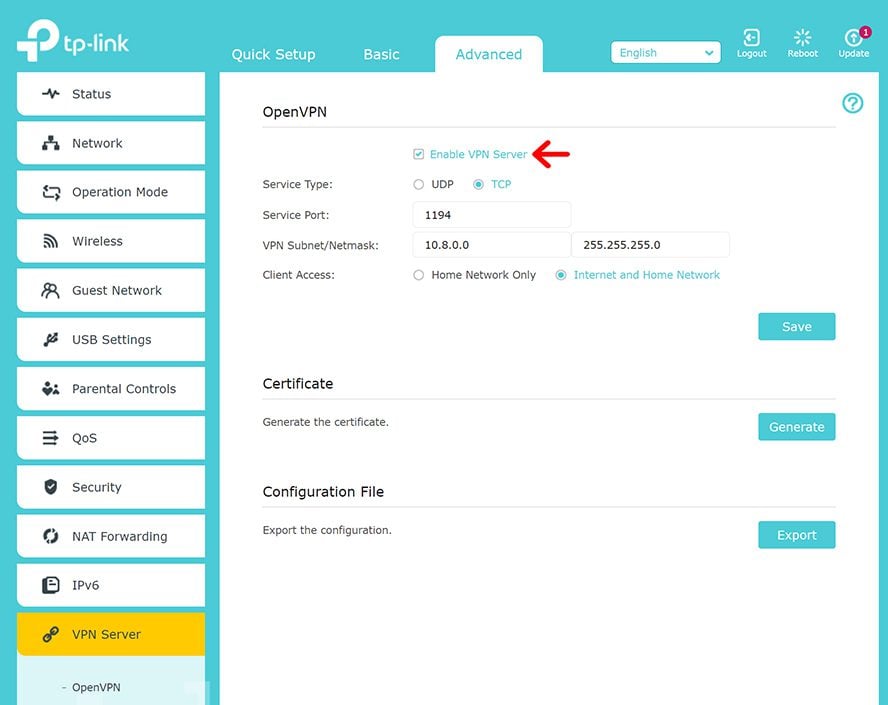
If this is your first time setting up a VPN on your router, you might have to generate a new key or make other changes, depending on your router. If you get the choice between UDP and TCP, the more secure type is TCP.
9. Disable WPS
WPS (WiFi Protected Setup) lets you push a button on your router to connect to devices in your network instead of entering a password. While this makes it easier to connect to certain devices, like printers, it will make your WiFi network less secure.
How to Disable WPS on Your WiFi Router
To disable WPS on your WiFi router, type your router’s IP address into the address bar of any web browser. Then log in to your router and go to Advanced Settings > Wireless and choose the WPS tab. Finally, uncheck the box next to WPS and click Save or Apply.
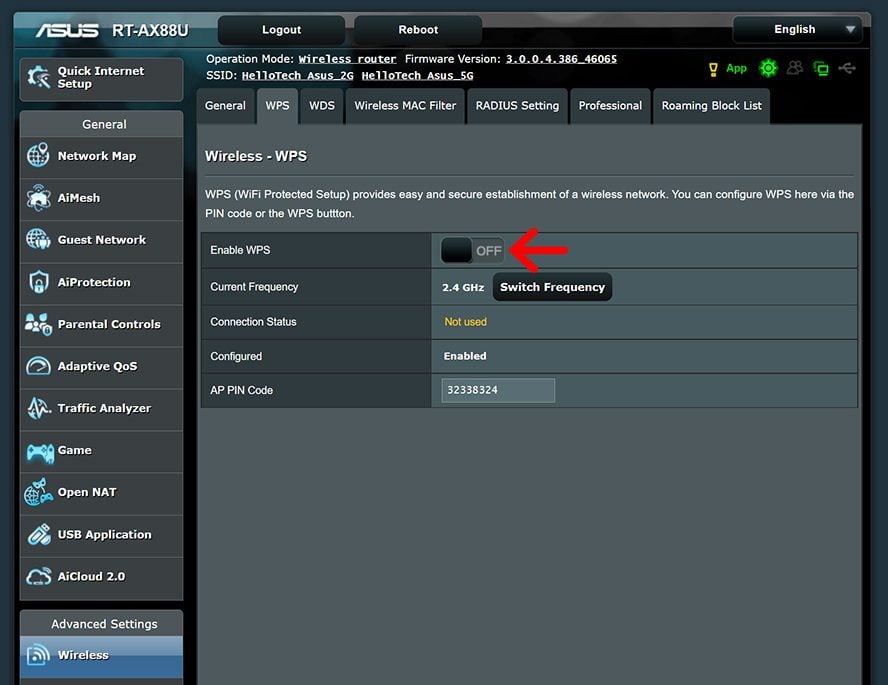
If you have a dual-band router, make sure to disable WPS for both your 2.4GHz and 5GHz networks.
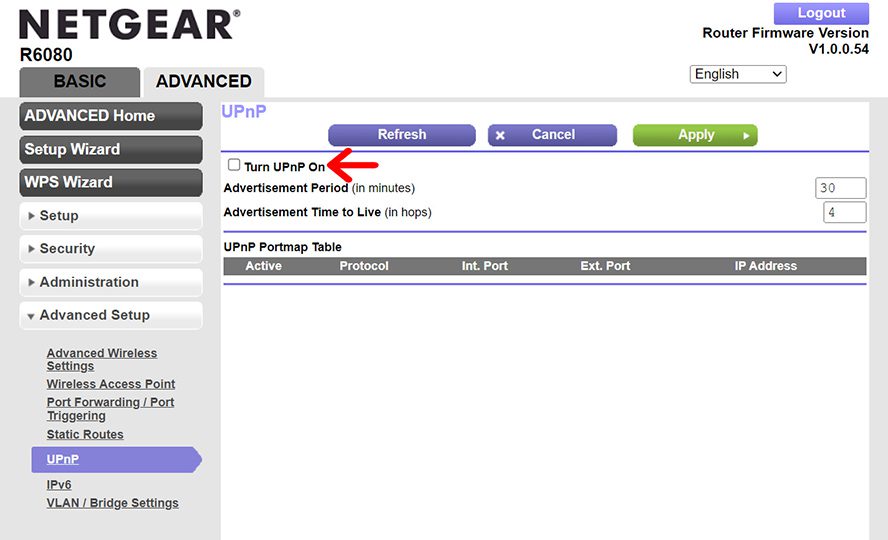
10. Disable UPnP
UPnP (Universal Plug and Play) is a service that allows devices on your WiFi network to discover each other and automatically connect. However, cybercriminals can use this feature to
How to Disable UPnP on Your WiFi Router
To disable UPnP on your WiFi router, type your router’s IP address into the address bar of any web browser. Then log in to your router and go to Advanced Settings or Security. Then uncheck the box next to Enable UPnP or something similar and click Save or Apply.
11. Upgrade Your Router
If your router is old, or you are still using the router provided by your ISP, you might want to consider upgrading to a newer model. When looking for a new router, make sure that it uses WiFi 5 or WiFi 6, it has WPA3 encryption, and it has at least two WiFi bands.
Read More: The best WiFi routers for any budget
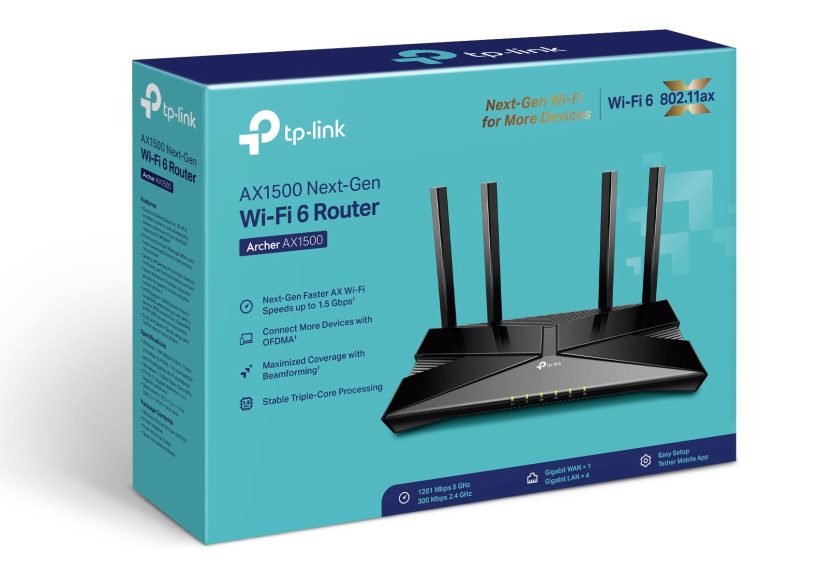
(Image Source: TP-Link)
If you don’t know where to start, HelloTech can help you decide what kind of router you need for your home. We have thousands of technicians across the country who can come to your home and set up your WiFi network for you as soon as today.
HelloTech editors choose the products and services we write about. When you buy through our links, we may earn a commission.

