
Did you just get your own Amazon Fire TV Stick? Did you know Amazon just released a 4K version?
Curious to know what you can do with it? Have it running in no time with this easy-to-follow guide on how to set up your Amazon Fire TV Stick.
The Fire TV Stick is Amazon’s answer to the growing demand for video streaming services. It is competing with similar products in the market such as Roku and Google Chromecast. It can provide all your entertainment needs in one dongle-sized device. The new 4K stick now has support for Ultra HD, HDR, and Dolby Atmos audio for $69.99.
So, what exactly can you do with it? Well, if you like to stream videos from content providers, such as Netflix, Amazon Prime, and more in a super convenient way, then this device is for you. It is also compatible with various apps and Amazon’s games library. You can also access music from Spotify and Prime Music. Overall, the Fire TV Stick gives you more and easy access to content such as videos, movies, TV shows, and music.
There have been numerous Fire TV Stick versions released in the market. The newest version features a complete overhaul of its interface. This means that it is now easier to operate and explore the features available to Amazon Fire TV Stick. Aside from that, the device’s processor capacity has been significantly upgraded. This makes operations a lot smoother.
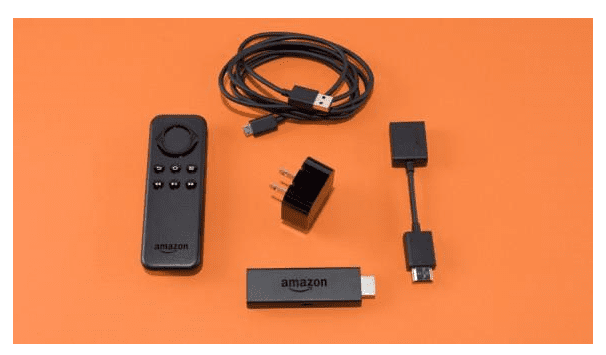
When you purchase your own Amazon Fire TV Stick, each box will come with a few important items. Apart from the main device, there is also a micro-USB dongle that comes with an HDMI port. You will get the Alexa Voice Remote as well. In addition, you will get a USB cable and power adapter. An HDMI Extender and HDMI Adapter are also included to optimize connectivity. Lastly, you should get 2 AAA batteries for the remote.
What You Need
To begin setting up the Amazon Fire TV Stick, you need these things.
- Compatible TV
- Internet connection
- Amazon account
A compatible TV is important. The Fire TV Stick works excellently with HD and ultra HD television models with HDMI input port.
Aside from a TV, you will need an internet connection. The Fire TV Stick must be connected to a Wi-Fi network to ensure a smooth setup process.
You will also need an Amazon account. This is because you need to register your Amazon Fire TV Stick device under your Amazon account. This will allow you to access the content you want anytime, as well as know about the latest software updates and features. If you don’t have an Amazon account yet, be sure to sign up for one.
Setup Guide
Once you have all the necessary things ready, it is time set up your Amazon Fire TV Stick. Follow the steps below to get your device up and running:
Step 1: Connect the power adapter
- Plug the USB power cord to the Fire TV Stick’s Micro USB port.
- The other end of the cord must be plugged into the power adapter.
- Make sure the power adapter is also plugged into a power source/outlet.
- Always use the power adapter that is shipped with the device. Most TVs come with powered USB ports. However, it might not be enough for the device to work properly.
- Word of warning: never connect your Amazon Fire TV Stick to an unpowered HDMI hub. This could cause the device to malfunction.
Step 2: Connect to the TV
- Look for the HDMI port on your TV and plug the device into it.
- You can also use the HDMI extender to securely fit the device into your TV.
- Choose the right HDMI port to connect to. You will need to input the corresponding detail on the next step.
Step 3: Choose input channel
- Turn your TV on.
- As mentioned earlier, choose the right HDMI input channel. Enter that onto your TV when prompted.
- Once successfully selected, you will see the Fire TV Stick logo appear on your TV.
Step 4: Set up the remote
- Use the batteries provided for the remote.
- Using your thumb, follow the direction of the arrow on the back of the remote. Insert the batteries into the corresponding slots. Place the cover back in place.
- Take the time to learn about how to operate the remote to maximize its features.
Step 5: Pair remote with the device
- In this next step, you need to pair the remote with your Fire TV Stick. Once you have correctly set up the remote and placed the batteries in, it will automatically connect.
- If the remote does not automatically pair with the device, press the Home button. Hold for a few seconds. Then, scroll up until you find the “Discovery Mode”. Choose that option to complete pairing the remote with your Fire TV Stick.
Step 6: Connect to the Internet
- The next step is to connect your Amazon Fire TV Stick to the internet. Follow the on-screen prompt on how to search for and connect to a Wi-Fi network. You can also connect via a wired connection.
- On the Fire TV menu, go to Settings and then choose Network. This will prompt the device to search for wireless networks in the area.
- Choose your preferred network. If you cannot find your network, choose Rescan or Join Other Network. Make sure your connection is not hidden so you can connect to it.
- If the connection requires a password, enter it.
- You will know when your device has successfully connected. A confirmation message will be shown on the screen.
- If you are connecting to a wired network, you will need an Ethernet cable. This is not included in your Amazon Fire TV Stick box. Make sure to purchase one, if you do not already have one.
- Connect one end of the Ethernet cable to your Amazon Fire TV Stick. The other end of the cable should be connected to the router or modem. Go to Settings and then Network. Choose the Wired option when selecting which network to connect to. Like the Wi-Fi network, you will also see a confirmation message upon successful connection.
- Note: During your first time setting up your Wi-Fi network, you will be prompted to save the password. Saving the password is a convenient feature that allows you to easily connect in the future. It can save you time since you no longer have to enter the password every single time. So, if you are connecting to a secured network that you own, choose “Save Wi-Fi Passwords to Amazon”. However, if it is a shared network that strangers can access it, you can skip this step.
Step 7: Register Your Amazon Fire TV Stick Device
- You need to register your Amazon Fire TV Stick. You can do this through your Amazon account. This is an important step to access all content that you wish to enjoy. Whether you want more movies, TV shows, videos, or music – registering will instantly improve your media experience. By registering, you will also find it easier to manage your content.
- During your first time to set up, you will see on-screen instructions on how to register your device. Follow those instructions.
- Go to Settings on the Fire TV menu. Choose My Account. A Register option will be displayed if your account is not registered yet. Note that if you purchased your Fire TV Stick via Amazon, it will be automatically registered.
- You can also select the Deregister option. This will enable you to register your device to another Amazon account.
Step 8: Get Started
- Once the setup is complete, you are now ready to use the device. If the setup process was done correctly, you will see a “Welcome” video on the screen. You can also play the video. It will show tips on how to use the features available on the Fire TV Stick.
- The Home menu is where you will start and access the Fire TV features. You can quickly access Your Apps & Games. In here, you will find Amazon apps and some third-party apps like Hulu and Netflix.
- To watch movies and TV shows, go to the Home menu. Choose Movies or TV Shows to browse through content. You will be able to rent or buy movies and TV shows you like to enjoy. Amazon Prime members can also enjoy extra perks such as featured category.
- Can’t find the content you want? You can use the Search feature on your Amazon Fire TV. Simply enter the search phrase for the related content you are looking for. If you have a Fire TV remote, you can also activate voice search. Look for the Voice button on the Fire TV remote. This will save you time and the hassle of typing on an on-screen keyboard. The search capability is also available in some but not all supported apps.
- The Fire TV Stick will automatically switch into sleep mode when idle. Hence, there is no need to turn it off every after use. However, you still have the option to turn it off when you need to. You can also just unplug the TV you connected the streaming stick to. That will effectively turn it off as well.
With these, you should now be able to use your Fire TV stick as much as you can. With the rich array of features and functionality, you can get from this device, you won’t need satellite or cable subscriptions anymore.
If you’re still having problems figuring out how to set up your Amazon Fire TV Stick, check out our guide on how to reset your Fire Stick.
