
Apple recently released its newest operating system for Macs. Once you upgrade your computer to macOS 12, also known as Monterey, you can use several new features that let you pull text from photos, block unwanted notifications during work hours, conserve your MacBook’s battery life, and more. Here are the best new features you’ll get when you update your Mac to macOS Monterey, and how you can start using them now.
Can You Update to macOS Monterey?
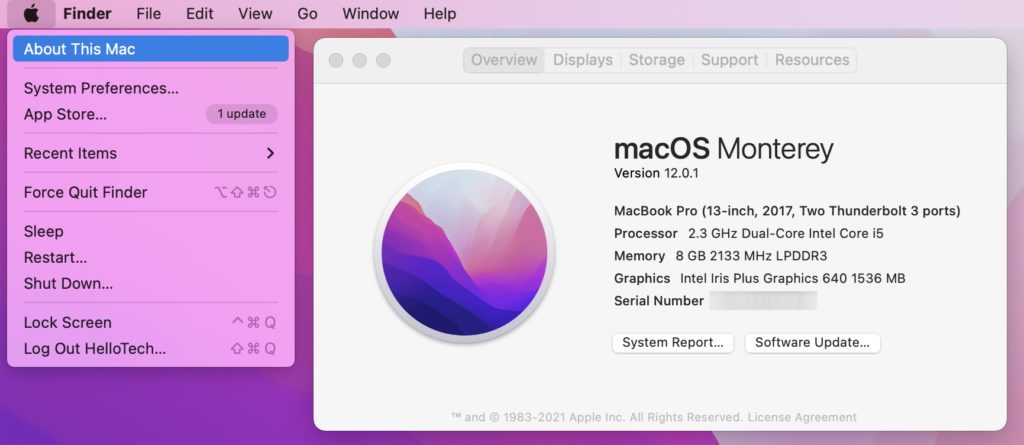
Before you update your Mac to macOS Monterey, you need to know if your computer is compatible with the new operating system. To do this, click the Apple icon in the top-left corner of your screen and select About this Mac. You will see the model and year of your Mac near the top of the window.
The following Macs are compatible with macOS Monterey:
- MacBook (2016 and later)
- MacBook Air (2015 and later)
- MacBook Pro (2015 and later)
- Mac mini (2014 and later)
- iMac (2015 and later)
- iMac Pro (2017 and later)
- Mac Pro (2013 and later)
If your Mac is compatible, you can click Software Update at the bottom of the About this Mac window to update to macOS Monterey.
Read More: How to update your Mac, and what to do when it won’t update
New Photo Collections in Messages
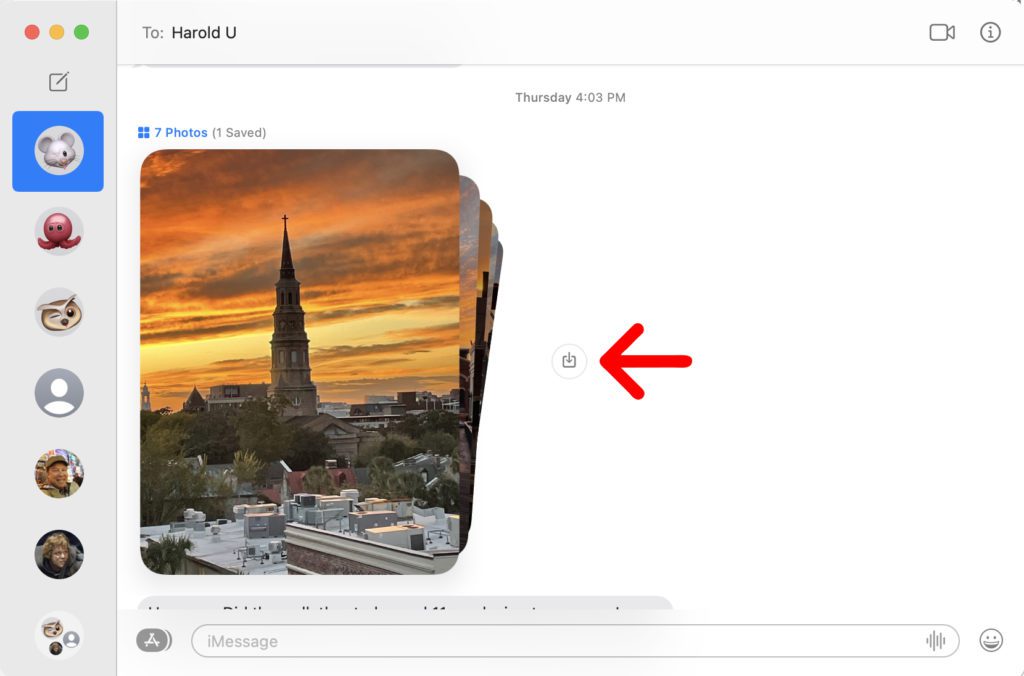
Once you update to macOS Monterey, you might notice the pictures that you receive in the Messages app look a little different. With the new Photo Collections feature, all the pictures sent to you will be grouped together in an album. This allows you to flip through the album, view it in a grid, and quickly save any pictures to your Photos app.
How to View Photos in Messages
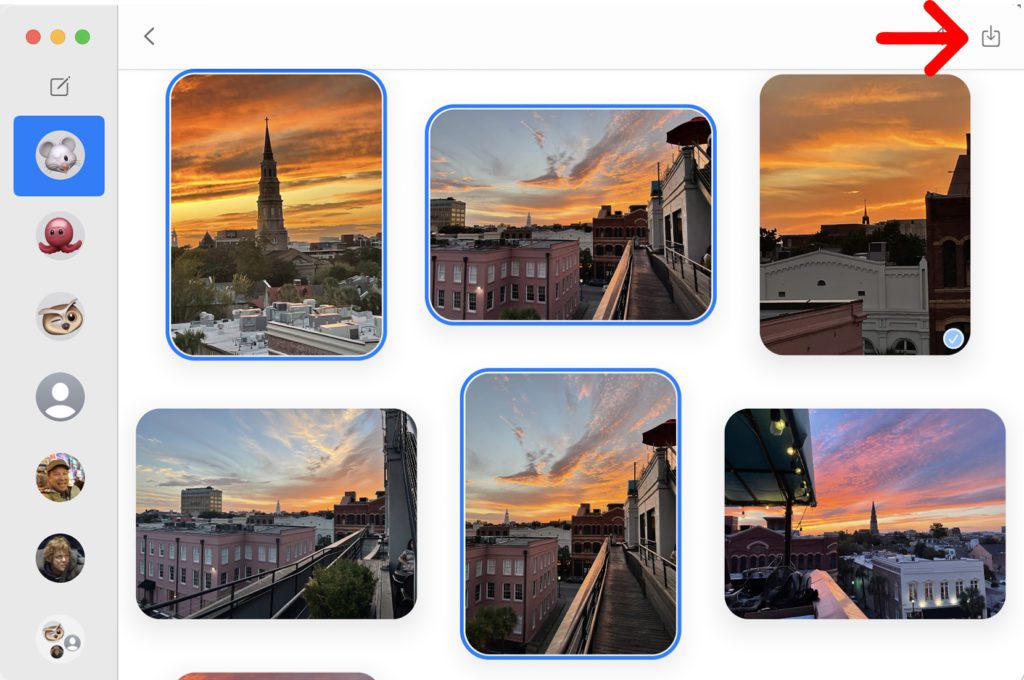
To view photos sent to you in the Messages app in macOS Monterey, you can swipe through an album using two fingers on a trackpad. Or you can click the blue tile icon above the album to open them all in a grid view. Then you can then double-click a photo to enlarge it.
How to Save Photos in Messages
To save a photo collection in macOS Monterey, you can click the download button to the right of the album. This button will have an icon with an arrow pointing down into a box. Once you click this button, all the photos in the album will be saved to the Photos app.
You can also download individual photos by opening the grid view. Then select the photos you want to download while holding down the Option key on your keyboard. Finally, click the download button in the top-right corner to save them to your Photos app.
Safari New Tabs Design
Apple also changed the look of its web browser in macOS Monterey. Safari now features a more compact toolbar that integrates your search bar with your open tabs. The newly-designed tab bar will also change colors to match the site you’re on. And, you will see a preview of the web page when you hover over a tab.

How to Revert Back to Classic Tabs in Safari
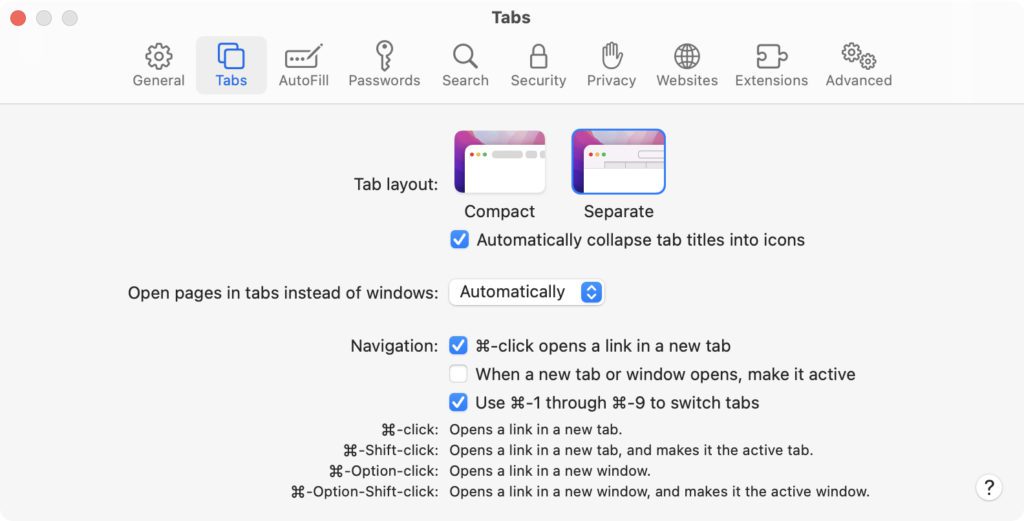
If you don’t like the look of the new compact tab bar in Safari, you can always change it back to the classic look. To do this, open Safari and press the Command + Comma keys on your keyboard at the same time. Then click the Tabs tap at the top of the window and select Separate under Tab layout.
New Safari Tab Groups
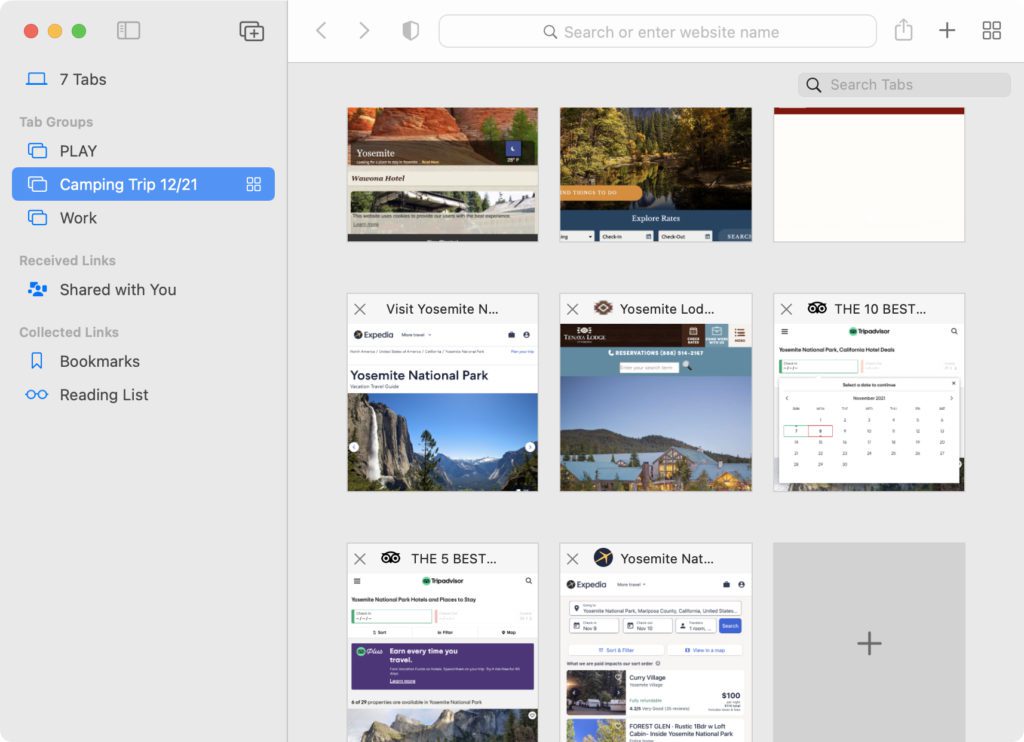
In addition to changing the look of Safari tabs in macOS Monterey, Apple also added a new feature called “tab groups.” This lets you save and organize several tabs into albums, so you can quickly open all the tabs you need for work, and then switch to a tab group with sites you saved to plan for your next vacation.
How to Save and Organize Safari Tab Groups in macOS Monterey
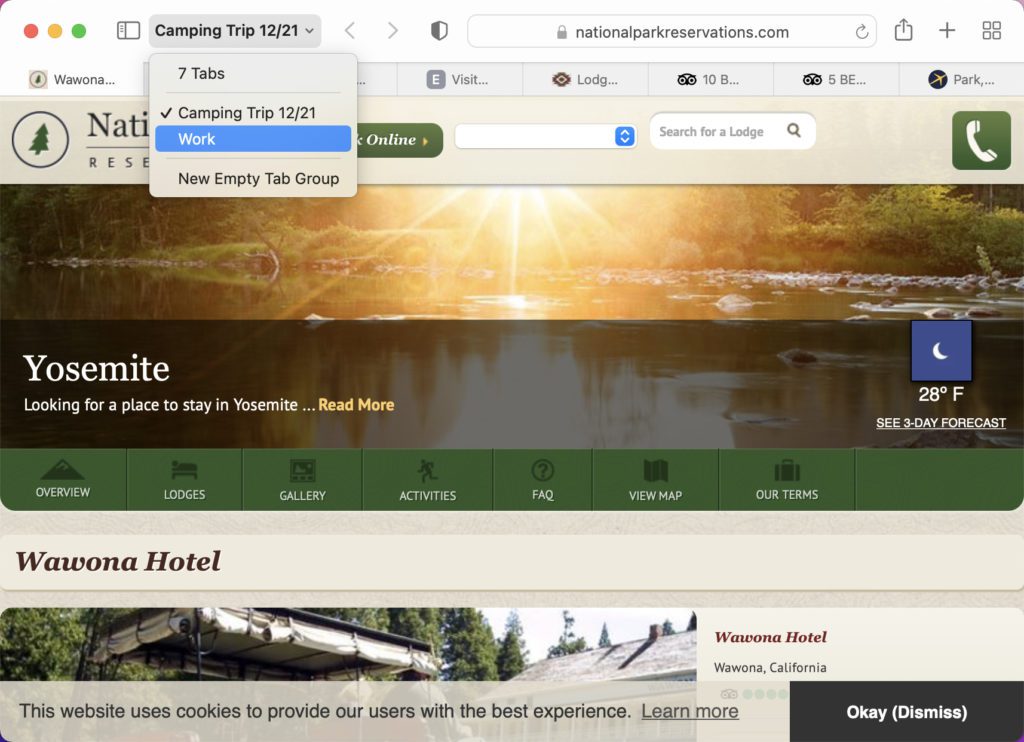
To create a tab group in Safari, open one or more web pages that you want to save. Then click the downward-facing arrow in the top-left corner of your browser window (just to the right of the Sidebar button). Finally, select New Empty Tab Group to create a new group or add all your tabs to a new group.

You can also right-click any tab and select Move to Tab Group from the pop-up menu to add a new web page to one of your existing tab groups. Then you can click the sidebar button to view and edit all of your tab groups. To expand a tab group, select it from the left sidebar and click the grid icon to the right of its name.
Get More Work Done With the New Focus Mode
If you’re tired of receiving notifications while you’re trying to get work done, Apple’s new focus mode will automatically block certain notifications and messages during certain times of the day. You can set up different focus modes for different activities, and these modes will work across all your Apple devices at once.
How to Set Up and Use Focus Mode on a Mac
To set up a focus mode in macOS Monterey, click the Apple icon in the top-left corner of your screen and select System Preferences. Then click Notifications & Focus and the Focus tab at the top of the window. Finally, select one of the focus modes in the left sidebar or click the plus sign at the bottom to create a new focus mode.
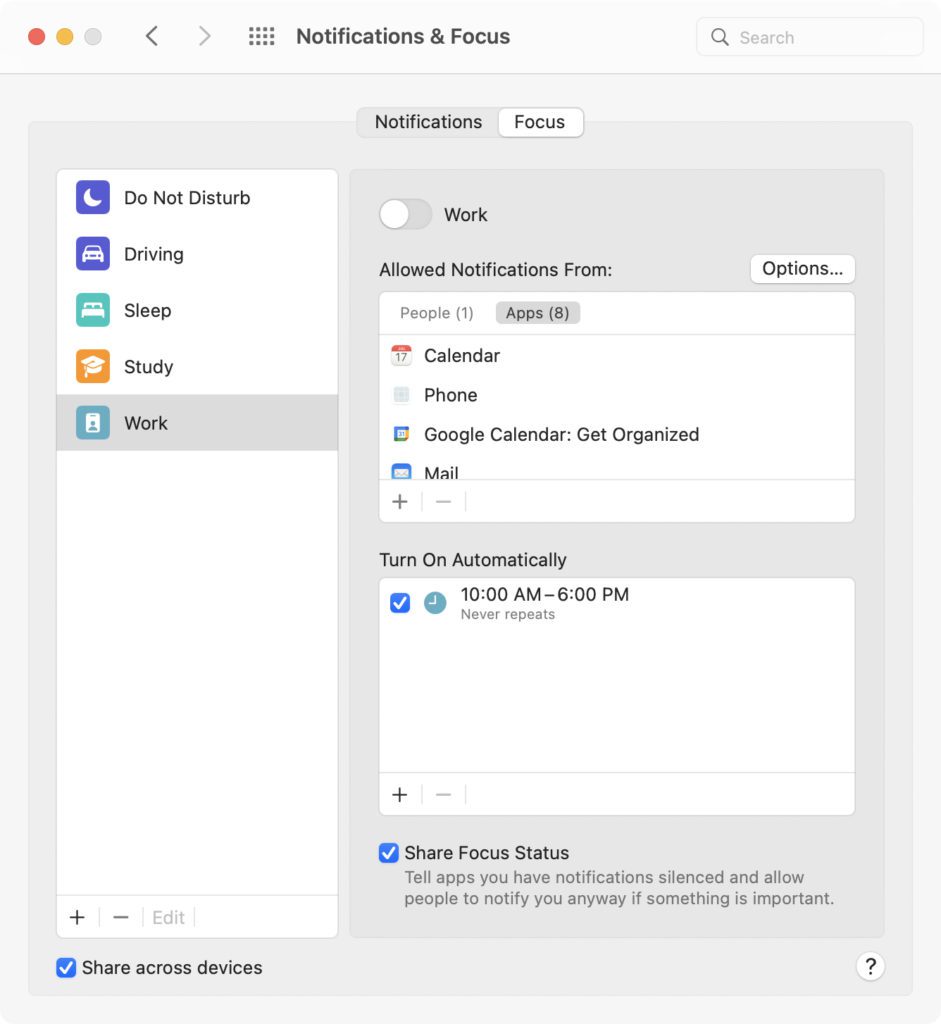
From here, you can customize each focus mode. To do this, click the plus signs on the right side of the window to add people and apps you don’t want to block. Then you can set up a schedule to automatically turn your focus mode on and off at certain times. Finally, you can check the box next to Share Focus Status to send an automated message to anyone who tries to contact you.

Don’t worry. While this macOS Monterey feature will notify people when you are busy, there is still a way for them to get through to you in case of an emergency.
Live Text Comes to macOS Monterey
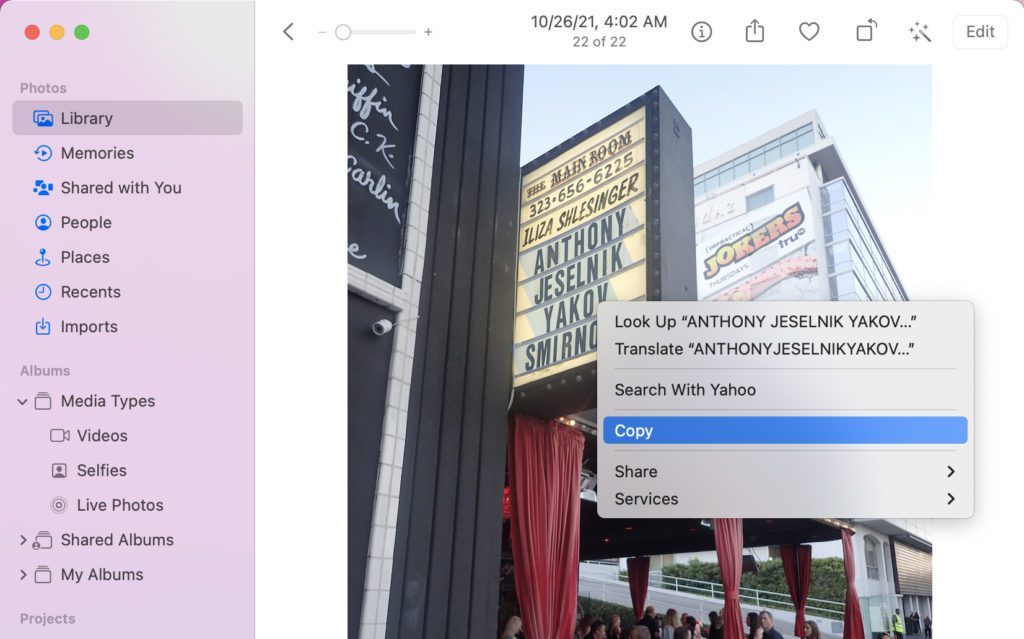
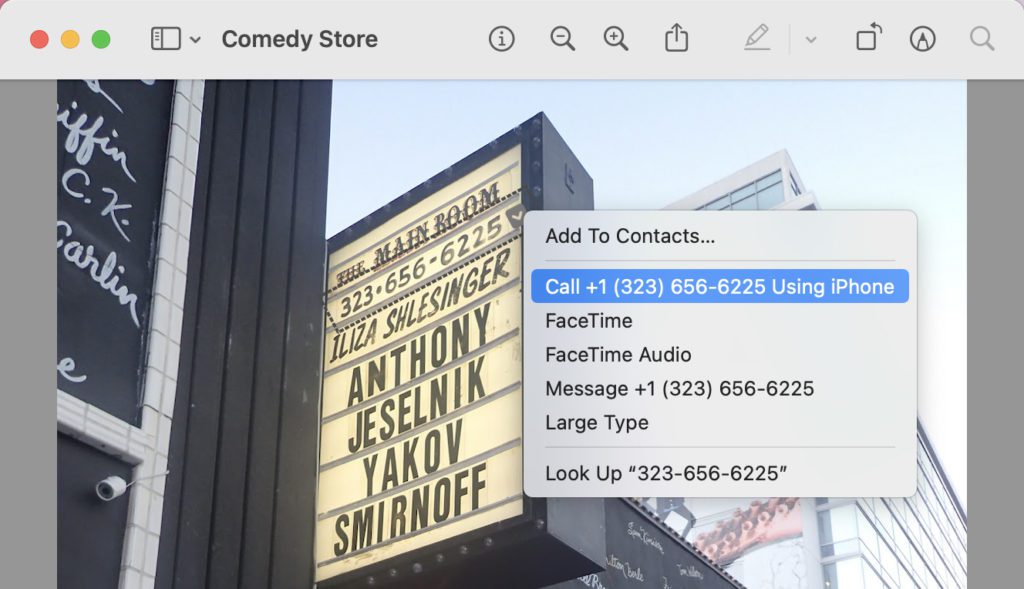
Apple recently added a feature called Live Text to macOS Monterey, which allows you to highlight text from your pictures and copy it to another app. Plus, you can look up any text on the web, translate it, see locations in the Maps app, call phone numbers, and more.
How to Use Live Text on a Mac
To use Live text on a Mac, open a picture in the Photos app or Preview. Then click and drag your mouse over any text to highlight it. Finally, right-click or Control-click the highlighted text and select an option from the pop-up menu.
If you see an address, phone number, or other information, you can hover your mouse over it and click the downward-facing arrow that appears. This will open a different menu that lets you get directions, send a message, and more.
Find Out More About Your Photos with Visual Look Up
In addition to being able to pull text from your photos, macOS Monterey also lets you look up information about the subject of your pictures. With the new Visual Look Up features, you will see more information about famous landmarks, the breed of your pets, and other objects in your photos.
How to Use Visual Look Up on a Mac
To use Visual Look Up on a Mac, open a photo in the Photos app or Preview and click the icon with an “i” in a circle with two stars. If you don’t see the two stars, the photo won’t work with the Visual Look Up feature in macOS Monterey.
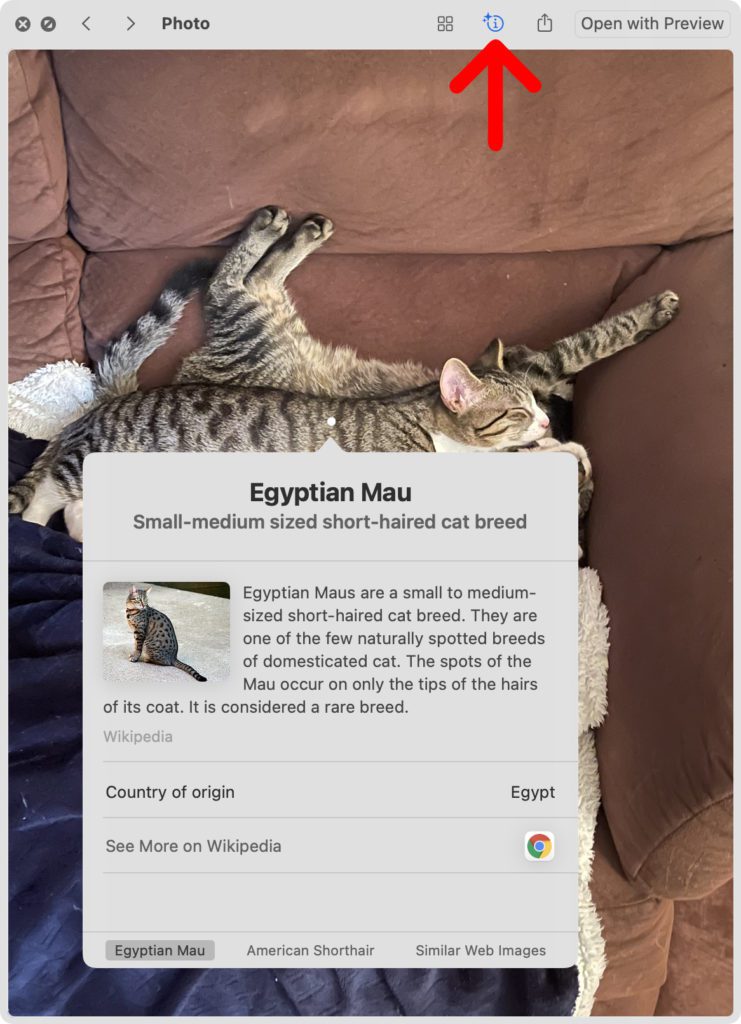
You can then scroll down to see more information about your photo, as well as directions, links to websites about the subject, and more.
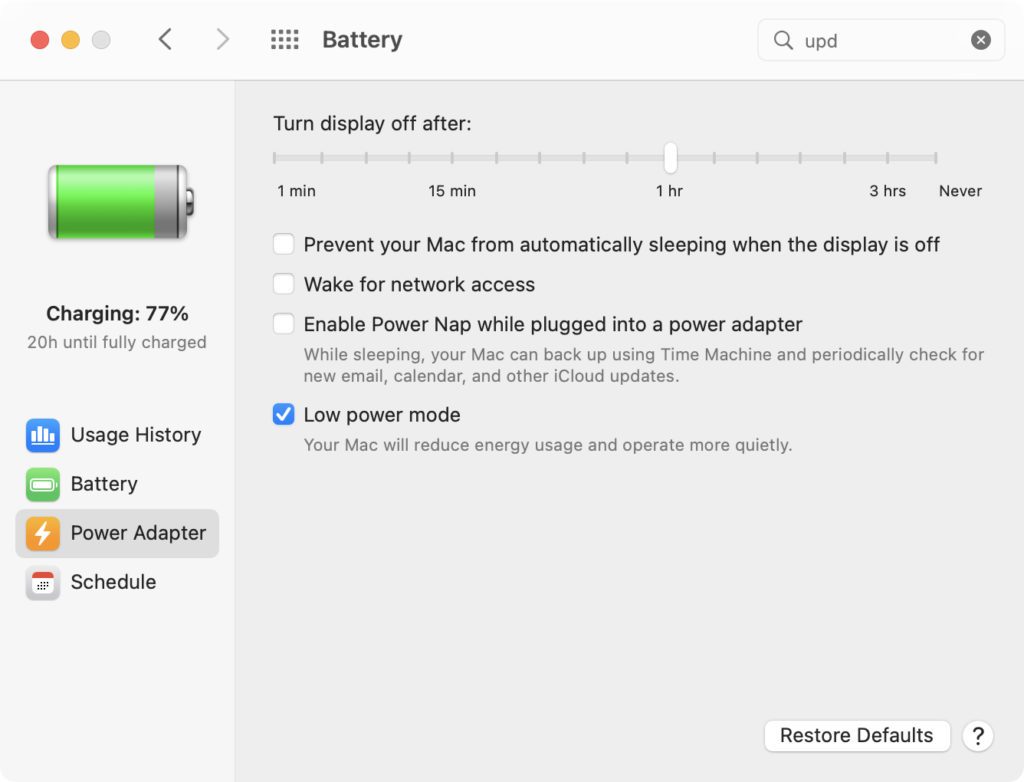
Low Power Mode for MacBook Users
One of the best new features is macOS Monterey originally comes from the iPhone. Apple added a new “low power mode” to help MacBook users extend the life of their batteries. Once you turn on this feature, it will reduce your screen brightness and the system clock speed.
This will make your computer run a little slower, but it will also reduce the fan speed on your MacBook, making your laptop quieter.
How to Use Low Power Mode in macOS Monterey
To turn on low power mode on a Mac, click the Apple icon in the top-left corner of your screen and select System Preferences. Then click the Battery icon and select either Power Adapter or Battery from the left sidebar. Finally, check the box next to Low power mode.
Read More: How to Make your MacBook Battery Last Longer

